Thanks for visiting the Art of the Image blog. We've moved over to www.artoftheimage.com so this blog is no longer updated, but please feel free to peruse the articles and content here.

When you're finished, please visit us at www.artoftheimage.com for all the current blog posts and information. Thanks!!!

Friday, July 31, 2009

What has 19 D700 DSLRs, 82 Nikon lenses, 24 Nikon Speedlights, and 22 di-GPS Pro Units?


Oyster does, that's what!


For those of you that have never heard of Oyster, check 'em out!

Oyster has "thousands of undoctored hotel photos and the world's most comprehensive, professional hotel reviews."

The really cool thing that I like about Oyster is that the Nikon D700 DSLR is their favourite camera of choice!

Oyster has tons of great photos from locations all over the world, and almost all of them are shot with Nikon D700 DSLRs!

I'm a huge fan of the Nikon D700, and you can see why when you look at a site like Oyster and see so many great photos that are just amazing quality images. The D700 delivers an image file that is second to none, and you can really see it when looking through the D700 photos at Oyster.

Kudos to Oyster for choosing what may just be the best DSLR on the planet!

Thursday, July 30, 2009

Geotagging Photos & Nikon DSLR GPS Options

Using a GPS unit for geotagging photos with your DSLR is getting more and more popular.

It's easy to see why because geotagging photos is fun!

Just look at Terry White's post, Nikon D300 + N2 di-GPS = FUN!

If you shoot with a Nikon DSLR, there are several options for geotagging photos.

The N2 di-GPS that Terry reviews is one. It's $180 US including shipping, and as you can tell from Terry's post, he likes the N2 di-GPS.

N2-di-GPS-mini GPS Unit for Nikon DSLR

Dawn Technology Limited, the makers of the N2-di-GPS also have a pro version called the di-GPS Pro L with a built in data logger.

di-GPS-PRO-L GPS for Nikon DSLRs

Nikon's own GPS Unit, the Nikon GP-1 is another option. At just over $200 US, it's about the same price as the N2 di-GPS, and you can't go wrong buying Nikon.


The Promote Systems GPS is another option for Nikon shooters that works with the Nikon D300, D700, D3, D2X, D2Xs, D2Hs, D200 and Fuji S5 Pro DSLR Cameras. At $149, it's a fair bit cheaper than the Nikon GP-1 or the N2 di-GPS.


Gerard Prins over at Nikon Reviews in a Nutshell gives the Promote Systems GPS-N-1 a Highly Recommended in his review "Geotagging" with your Nikon. Review of the Promote GPS N-1.

The GiSTEQ PhotoTrackr is another option for Nikon DSLR cameras that may be your best value at the moment. Amazon has it on for $79.99 as of now while I'm writing this post.


Ben Spark has a review of the GiSTEQ PhotoTrackr on his blog, www.benspark.com, which he sums up by saying "The GiSTEQ™ PhotoTrackr™ ROCKS! And the GPS is very accurate."

If you want to get into geotagging photos with your Nikon DSLR, these are some great options to consider. Obviously your budget is going to weigh in heavily on what you choose, but the GiSTEQ PhotoTrackr looks like best value for geotagging photos at the moment.

** Update - New Geotagging article - Geotagging Photos and Nikon DSLR GPS Hardware and Software Comparison by Dierk Haasis**

Wednesday, July 29, 2009

AF-S Nikkor 70-200 mm f2.8G ED VR II Specs

Nikon Rumors has posted the specs for the new Nikon AF-S Nikkor 70-200 mm f/2.8G ED VR II.

I'm not sure how accurate they are, but they look like they could be the real thing. Nothing seems out of place, and they're pretty much what I would expect from the new Nikon 2.8 70-200mm VR II lens.

For those of you who aren't up to date, the existing Nikon AF-S 70-200mm F2.8G IF ED VR Zoom has been rumored to have an update in the works ever since the D3 came out.


Being one of Nikon's flagship lenses, the 70-200 F2.8G IF ED VR is due for an update to better it's performance on the FX Nikon DSLR bodies like the Nikon D3, Nikon D3X, D700, and soon to be announced Nikon D700X.

While the current Nikon 70-200 performs with top marks on DX bodies like the Nikon D300, Nikon D2X, and Nikon D90, it isn't quite so good on the FX Nikon DSLR bodies.

Check out internationally renowned Nikon photographer Bjorn Rorslett's notes on the Nikon 70-200mm's performance on the Nikon D3 (which you can apply to the Nikon D3X, Nikon D700, and forthcoming Nikon D700X).

I sold my Nikon 70-200mm f2.8G over a year ago and have been using fast primes instead, however, lately I've been thinking of getting another 70-200 so the new Nikon AF-S 70-200mm f2.8G ED VR II will likely end up in my bag. :)

How To Sell Your Photos For 5 Figures Plus


Photo by Robert Buelteman

When you create something this beautiful and this unique, you can charge a premium for it. Of course, it's coming up with the unique idea that is the hard part. :)

I don't know about you, but I'd LOVE to be selling my photos for 5 figures!

Robert Buelteman is, and it's pretty easy to see why. Buelteman's work is ABSOLUTELY incredible!

Buelteman has created a unique brand for himself, unique being the key word. I've never seen anything like Buelteman's Electric Plant Photos, and I bet you haven't either.


Photo by Robert Buelteman

Buelteman hits his plant subjects with 80,000 volts of electricity and then captures them on camera. It's taken him over 10 years of 60 hour + work weeks to create his collection of 80 photos. Talk about dedication. Obviously this project wasn't done a whim!


Photo by Robert Buelteman

Buelteman himself actually notes that he didn't come up with the idea. In fact, he makes use of some some techinques that have been around for a long time. Buelteman's photos are created using the priciniples of Kirlian photography, developed by Semyon Kirlian in the late 1930's.

Regardless, Buelteman has created some of the most amazing fine art photographs I've ever seen. I've spent quite a bit of time looking through his online gallery and marvelling at the images he's created.

If you're interested in reading more about how Buelteman creates his electric plant photos, the UK's Daily Mail featured him in a great article that explains more of his methods and showcases more of his work.

Tuesday, July 28, 2009

Lightroom Tutorial - Lightroom Lights Out Viewing Mode

Here's a quick Lightroom tutorial on a great little Lightroom secret you might not know about, Lights Out Viewing Mode.

It's a great way to quickly check out how your photo looks without having any distractions clouding what you're seeing in Lightroom. I'll show you the Lightroom keyboard shortcuts too, so click the play button and enjoy!


If you haven't seen them, check out my other Lightroom Tutorials.

If you don't have Adobe Photoshop Lightroom 2, Amazon usually has the best price.

Monday, July 27, 2009

Uncle Bob tells Joe McNally, "Enough is Enough!"

Okay people, I know you've been thinking the same thing I have, that Joe McNally needs to be told, so Uncle Bob is going to be your voice... the voice of photographers around the world, so listen up Joe!

I'll give you the short version first Mr. Joe McNally... ENOUGH IS ENOUGH!

What's that you say Joe? Enough of what?

As if you don't know!

Enough of the fancy shmancy photography already! You're making it really hard for the rest of us to do our jobs! How in the name of Kodachrome are we supposed to make our clients happy when they're looking at your suped up, slicked back, sick, pants around your crotch with your underwear showing for all to see because you're so cool, pictures and comparing them to ours!

You're clearly not thinking of anyone but yourself Joe. What about the rest of us photographers?

You're not the only one trying to earn a living with your camera you know!

How do you expect us to satisfy our clients when they can go to www.joemcnally.com, your fancy pancy website with your ohhhhh so good pictures and see what they could have got if they booked you?

How Joe? How? Uncle Bob and the rest of the photographers on this planet want to know!

It's really not fair at all Mr. Joe "I'm Michael Jordan with a camera" McNally. I mean, you have some pretty MAJOR unfair advantages. The deck is stacked in your favour. The Nikon gear, the Nikon photo shoots, the Nikon Speedlight DVD's... just look at this slick looking DVD ad from Amazon.com. Geez! Our clients can't even go shopping without getting hit over the head with you getting all in their face with "look how great my photos are" ads.


(by the way, I really liked the video... I've got your older one too... still trying to figure it all out... Uncle Bob's no spring chicken you know... BUT HEY! Don't get me off topic! I mad at you!)

The government should fine you like they did Microsoft for breaking the anti-trust laws and creating a monopoly on good photography. You can't have it all Joe. Bill Gates had to learn the hard way. Maybe it's time the government took Mr. Joe McNally down a notch.

And it's not just the Nikon stuff Joe! No, you have go and be a National Geographic celebrity, Time, Sports Illustrated, Newsweek, GEO, Fortune, Business Week, LIFE, New York, Mens Journal... where does it end Joe? Does Joe McNally have to get all the best gigs?

(loved the "Future of Flying" by the way... some awesome photos in that article - FOR THE LOVE OF PETE, MCNALLLY! I'm trying to make a point here, stop distracting me!)

I mean, just look at this photo you shot of the Pegasus!

Nikon Shooter Joe McNally X-47A Pegasus for National Geographic
photo by Joe McNally, from National Geographic's "Future of Flying"

Did you really have to light it so freakin' awesomely? Really Joe?

The rest of us don't all have 4, 236 Nikon SB-900 Speedlights with 10 British Secret Service Agents carrying them around for us Joe. You're hardly making it a level playing field.

Or what about this one Joe? Showing the rest of us up with the torchy dude twirling fire and all...

Nikon Shooter Joe McNally Torchy Dude Photo
photo by Joe McNally - www.joemcnally.com

Was the beautiful balance of ambient, fire, and subject lighting really neccessary Joe? Really?

Or what about this one of James the welder dude I just got in your email...

Nikon Joe McNally The Welder Dude Photo
photo by Joe McNally - www.joemcnally.com

Do you have to be so good with the Speedlights Joe? I mean we ain't even talking big powerful strobes here! Speedlights Joe... you're showing us up with Speedlights!

So I'm pleadin' with you here Joe. Do you think Joe McNally could save some awesome for the rest of us? Can you leave a little WOW Juice in the jug so we can have a little drink?

And for crying out loud... do you really need to haul out the 5, 672 freakin' SB-900's at every gig? Come on Joe! You're making yourself look good just from shear speedlight volume, not to mention the platoon of US Army Rangers you got carrying them all around for you.

That's all Uncle Bob's askin' Joe. Just leave a little for the rest of us mere photographer mortals.

Sure you wrote a book or two to try and teach us about how you do it. I know, I know, you thought that would make up for it.


And the DVD's, yeah... we covered those. They're good Joe, sure.

But you're killing us here Joe. Killing us!

Just a little Joe... just a little. That's all good ole Uncle Bob is asking.

For the all the rest of us photographers Joe... think of the rest of us. And think of little Tiny Tim at Christmas too Joe. Maybe he'd like to be a photographer someday.

See you next Monday,
Uncle Bob
Uncle Bob

Sunday, July 26, 2009

Swimming Up Stream - New Limited Edition Print at iPhonePhotoArt.com


Swimming Up Stream by Steve Bluestein


About the Artist

I'm a stand up comedian, playwright and TV writer. Photography has always been my passion. I take most of the my pix when on the road.

My blog has 30,000 readers and is a two year adventure into my life, my family and my emotions. It's funny, it's touching and some of the blogs will make you cry, if you're a Republican, some will really get you mad... but mostly you'll enjoy a pleasant read. Take a look at it:

web.mac.com/stevebluestein3/Site/Welcome_2.html


Digital Download - $2 Open Edition (for personal, non-commercial, use)


iPhone Photo Art Limited Edition Prints

Swimming Up Stream Print Type: Fine Art Archival Pigment Print

2"x3" - $20 Limited Edition of 500

8"x10" - $50 Limited Edition of 200

16"x20" - $200 Limited Edition of 100

20"x36" - $500 Limited Edition of 10


iPhonePhotoArt.com Submissions

Do you have an iphone photo, painting, drawing, or other work of iphone art you'd like to see featured on iPhonePhotoArt.com? Upload it to the iPhonePhotoArt Flickr Pool, and we'll review it to see if we think it's a fit for
iPhonePhotoArt.com.

10% of all proceeds from
iPhonePhotoArt.com go to 350.org in support of our planet's future. If you haven't been to 350.org yet, head over, check 'em out, and join the movement to solve the climate crisis!

Saturday, July 25, 2009

Vintage Hankerchiefs - New Limited Edition Print At 350art.org


Vintage Hankerchiefs by Linda Treter

Available in 2 Limited Edition Sizes

Vintage Hankerchiefs Print type: Fine Art Archival Pigment Print

8"x10" - $35 - Limited Edition of 350

12"x18" - $350 - Limited Edition of 35

About the Artist

Linda Treter is a "self-taught photographer and administrator at the online Digital Photography School forum. Capturing the beautifully simple and everyday things in life, I try to put a little piece of me into each of my images and hope they waken sweet memories for you."


350art.org Submissions


Do you have a photo, painting, drawing, or other work of art you'd like to see featured on 350art.org? Upload it to the 350art Flickr Pool, and we'll review it to see if we think it's a fit for 350art.org.

35% of all proceeds from 350art.org go to 350.org in support of our planet's future. If you haven't been to 350.org yet, head over, check 'em out, and join the movement to solve the climate crisis!

Friday, July 24, 2009

Laurence Kim - How I Retouch

Laurence Kim has a great post on retouching photos entitled Tutorial: How I Retouch.

Laurence walks you through his whole process for retouching photos, specifically head shots.

Here's Laurence's before image, before any retouching.


And here's the result after Laurence has worked his magic and done his photo retouching.


As you can see, Laurence does an amazing job at retouching photos.

Check out the full article here.

Thursday, July 23, 2009

iPhone Photo Art... Art from iPhones!

Got an iPhone? If so, I'm pretty sure you've taken some photos with it.

Submit your favourites to the iPhone Photo Art Flickr Pool, and we may choose your iPhone Photo to feature at our new online art gallery, iPhone Photo Art.

iPhone Photo Art will be featuring Limited Edition Fine Art Prints and Open Edition Digital Downloads.

It's exclusive... nothing but iPhone Photo Art!

Everything you'll see available at iPhone Photo Art will be from an iPhone.

10% of sales goes to 350.org, and we split the rest with the artist. Bet you didn't think you could make money from your iphone photos?

Who knows... maybe you'll become famous!

Wednesday, July 22, 2009

Using the Nikon 50mm f1.8 for Macro Photography

The Nikon 50mm f1.8 is one of my favourite lenses, as you probably gathered if you've read 50mm Glory.

The Nikon 50mm f1.8 is lightweight, tack sharp, and a SUPER bargain at just over $100.00 new.


Technically, the Nikon 50mm f1.8 isn't a macro lens. By definition, macro photography is 1 to 1 magnification and above, and the Nikon 50mm f1.8 is listed by Nikon as having a Maximum Magnification Reproduction Ratio of 1:6.6.

A true macro lens like the Nikon 105mm Micro f2.8 VR has a Maximum Reproduction Ratio of 1:1. Mind you, it also costs almost $800 more than the Nikon 50mm f1.8, not to mention being much larger and heavier.


So, it's probably more correct to say we're talking about using the Nikon 50mm f1.8 for close-up photography rather than macro photography. Regardless of what you want to call it, close-up photography or macro photography, you may be pleasantly surprised with the Nikon 50mm f1.8 if you haven't used it for this purpose before.

A couple of my photographer friends and I went out last Friday to do a little personal shooting, and we chose the Wings of Paradise Butterfly Conservatory in Cambridge, Ontario as our destination. (As a sidenote, Wings of Paradise is a great place to go for a photo trip or just to take the family for an outing.)

Opening my camera bag, my Nikon 50mm f1.8 quickly found it's way onto one of my D300 DSLR bodies, and I was off to hunt butterflies. Here's some of the photos I got with the 50.


Nikon D300 with Nikon 50mm f1.8 @ ISO 200 1/250th @ f8


Nikon D300 with Nikon 50mm f1.8 @ ISO 200 1/400th @ f4


Nikon D300 with Nikon 50mm f1.8 @ ISO 200 1/250th @ f8


Nikon D300 with Nikon 50mm f1.8 @ ISO 200 1/250th @ f8


Nikon D300 with Nikon 50mm f1.8 @ ISO 200 1/250th @ f8


Nikon D300 with Nikon 50mm f1.8 @ ISO 200 1/250th @ f8


Nikon D300 with Nikon 50mm f1.8 @ ISO 200 1/250th @ f10


Nikon D300 with Nikon 50mm f1.8 @ ISO 200 1/250th @ f11


Nikon D300 with Nikon 50mm f1.8 @ ISO 200 1/250th @ f8


Nikon D300 with Nikon 50mm f1.8 @ ISO 200 1/60th @ f4

As many of you have probably guessed, most of these were shot with off camera flash. I held one of my Nikon SB-800 Speedlights in one hand, and the camera in the other, and played around with the angle and distance of the flash until I liked what I saw on my D300's LCD.

I used my SU-800 as the controller for the SB-800 which allowed me to keep the camera set-up lightweight and made flash adjustments to the SB-800's output quick and easy. I could've used the D300's pop-up flash as a commander, but even when set not to contribute to the exposure, I find it still does.


The SU-800 is also easier to use as a commander than the D300 is, making changes and adjustments much easier. You could also use another SB-800 or an SB-900 as a commander, but they're heavier and much more bulky then the SU-800. I prefer the SU-800, but of course, if you don't have one, by all means use an SB-800, SB-900, or your camera's pop-up flash if it has one with a commander function like the Nikon D300 does.

Next time you're wanting to do some macro photography, or close-up photography if you want to technically correct, why not give your 50mm a try? Even if you have a macro lens, you may be surprised what the little Nikon 50mm f1.8 can do. If you don't have a macro lens, just throw on your 50mm and start shooting! :)

Read more about the Nikon 50mm f1.8D:

Nikon 50mm f1.8D vs Nikon 50mm f1.4G

50mm Glory

Tuesday, July 21, 2009

Lightroom Workflow : Import Photos : How To Get Your Photos To Look Like They Did On Your Camera LCD

I received this email from a frustrated Lightroom user who can't get their photos to look like they did on the camera LCD after they import photos into Lightroom.

Hi Matt My husband has a Nikon D200 and we are currently using Lightroom 2.2. He shoots in RAW. The problem is that when he imports into Lightroom the colours turn dull and sometimes greenish and dark. How do you mange your workflow?? Do you import into Nikon transfer and then into Lightroom or how do you maintain the colours you see on your LCD screen? Any assistance would be greatly appreciated. We have been trying to figure this out for 10 months and are thoroughly frustrated. Jodie

I've heard this complaint many times, and I've had a lot of people ask me how to fix it.

The basic problem is one of presets and profiles. When you look at the image on the back of your camera's LCD, you're seeing the image as it would look as a processed-in-camera jpg, regardless of whether you're shooting RAW or not.

When you look at the same RAW file on your computer in Lightroom, your viewing the file as you've told Lightroom to show it to you. If you haven't given Lightroom any instructions on how you want to see your RAW files, it is most likely defaulting to the Adobe Standard profile, which is why your image doesn't look anything like what it did on the back of your camera.

This isn't a bad thing. You can change it easily. Like any piece of powerful software, Lightroom has a lot of versatility in what you can do, and this is one of the first steps you should take in your Lightroom Workflow when you import photos.

It's an easy step, and you can set Lightroom to default to your new preferences so that Lightroom will apply them automatically when you import photos, saving you time and making sure that your photos always look like they did on your camera LCD (if that's what you want).

The key to this step in your Lightroom Workflow is the Lightroom Camera Profiles. With the introduction of the Lightroom Camera Profiles, Adobe made things REALLY easy when it comes to getting your photos to look like they did in camera.

To select a Lightroom Camera Profile, make sure you're in the Lightroom Develop Module. Click on the Camera Calibration menu at the bottom of the list below Vignettes.


Now you should see the Profile field at the top just below the Camera Calibration Menu.


Click on the little arrows to the right of where it says Adobe Standard, and you should see this drop down menu.


Select the Camera Profile that matches what your camera is set to by clicking on the profile. For me, that's usually Camera Vivid. My screen now looks like this.


If you've selected a different profile, your screen should show the one you've selected.

Now the next step is to make this a preset so that we can apply it when we import photos, saving ourselves a lot of time and making our Lightroom Workflow more efficient. You can just apply it to the first photo and then use "Sync" to apply it to all the rest, but that's not terribly efficient. Applying it when you import photos is much better.

In the top left under Presets, click the little plus sign.


You should see this menu now.


1. Name your preset. I named mine Camera Vivid.

2. Make sure Calibration is the only box checked. The easy way to do this is to click the Check None box and then click on Calibration.

3. Click Create.

You should now have a Camera Vivid (or whatever you named your preset) showing under the User Presets.


Now, when you import photos into Lightroom, you can apply your new camera profile preset automatically. When the Import Photos window opens, you can select your camera profile preset you just made under the Develop Settings drop down menu, and it will be applied to all your photos as they're imported.


You can make as many camera profile presets as you want. If you use more than one camera profile regularly, creating a preset for each one you use will speed up your Lightroom Workflow even more. Just apply whichever you want when you import photos into Lightroom.

If you don't have Adobe Photoshop Lightroom 2, Amazon usually has the best price.


How To Thrive As An Artist Without Selling Out:
The Unconventional Guide to Art and Money

Monday, July 20, 2009

Uncle Bob asks... Is Your Camera In Love With Your Computer?

Happy Monday Folks!

Uncle Bob here, and today I want to talk about a question that I know has been on everybody's mind a lot lately... Is Your Camera In Love With Your Computer?

It's an obvious question when you think about it. Two very attractive pieces of sophisticated electronics, both of which you love and use for photography... it's a problem that's bound to come up at some point.

I mean can you blame them?

Think of it from your camera's point of view. You plug it's memory cards into your computer all the time... for some folks it's several times a day. There's an unspoken level of intimacy there.

Some of you may even let your computer format your camera's cards, cranking it up yet another notch. I don't even let my wife format my cards. :)

And what about how your computer sees things. You, constantly handling your camera, cradling it lovingly in your hands, taking care not to bump it or push it's buttons too hard. You even make sure you place it loving in it's camera bag before and after every use. How could your computer not start to wonder if there isn't something just a little special about that camera you show all that care and attention to, never mind the amount of time you spend with it or the amount of money you spend on it!

Yes, you can see it's a situation that's just bound to occur sooner or later. How could it not? All the signs are there. Hey, it was you that introduced them! You made their worlds collide.

Not to worry though. There's a couple ways to make sure you don't end up in the middle of a messy situation between two of your best friends.

Make sure you set boundaries. Make it clear you don't want to know about it if they decide to take their relationship to the next level. You're happy for them, you just want to keep your relationship with your camera and your relationship with your computer just the way it is. What they do on their own time is up to them.

Don't show favoritism to one over the other, and if you do, hide it. Favoritism is a sure way to get your camera or your computer upset with you. Make sure you let them know they're both just as important as the other in your photography world, and to you personally.

If you follow these two simple rules, you've got a good chance of never finding yourself lying awake at night worrying if your camera is in love with your computer. It won't matter anyways, because you'll have followed good 'ole Uncle Bob's advice and kept yourself in the clear.

See you next Monday,
Uncle Bob


How Are Your Google Rankings? GOOGLE BUSINESS MARKETING

Sunday, July 19, 2009

The Nikon D700X... What Do YOU Want It To Be?

Ok, so we're all eagerly awaiting the Nikon D700X announcement. Rumors are flying, speculation is rampant, and we can't get enough.

What do YOU want the D700X to be?

What specs would you like to see when Nikon makes the big announcement?

I'd like to hear from you! I'm curious what your Nikon D700X would look like? Leave a comment and let me know.

I've outlined the specs I want to see in the Nikon D700X in my post Nikon D700X Replacement for the D700, as well as in my earlier post Stuff I Want.

I've also outlined the advantages and disadvantages of the Nikon D700X vs the Nikon D3X as I see them, based on the specs I anticipate seeing in the D700X.

Now it's your turn! Let us know what you want in a D700X!

UPDATE: Uncle Bob Leaks TOP SECRET Info On The Nikon D700X

Boost Your Google Rankings With GOOGLE BUSINESS MARKETING!

Canon EF 400mm f 2.8 L IS USM Lens Review - The Digital Picture


The Digital Picture has a review of the Canon EF 400mm f2.8 L IS USM.

Before you head over to check out the review, look at this.


That's B&H price for the Canon EF 400mm f2.8 as I write this post.

I'm not saying it's over-priced, I'm just warning you that you may want to sit down and write out some answers for the Mrs. (or Mr.) for when you walk in the door with it.

Either that, or head on over here and pick up one of these


or these


before you head home.

Just trying to make sure you don't walk in with a big smile and walk out pouting 30 seconds later. :)

How To Thrive As An Artist Without Selling Out:
The Unconventional Guide to Art and Money

Saturday, July 18, 2009

Darren Rowse's Aperture Workflow

Attention all you Aperture users!

Darren Rowse has a great post on Aperture workflow over at the Digital Photography School titled 8 Steps to Developing a Better Workflow in Aperture.

Whether you're new to Apple's Aperture, still considering it, or even a seasoned user, Darren's article is worth a read. The article is well written and his workflow is intuitive and well thought out.

Darren says he's been using Aperture for over two years now, and it shows in how well refined his Aperture workflow is. Check out the article as I think even the experienced user might learn a thing or two!

Friday, July 17, 2009

The Art of Water

Check out this awesome video of Martin Waugh's Liquid Sculpture photography. I've seen some good photographs of water and water droplets before, but Martin takes it to a whole new level!


Want to see some more cool images with liquids? The guys from Time Warp who filmed Martin's video, also did one on liquid cornstarch! Check it out.


How about Fire and Oil?


Liquid Nitrogen?


The possibilities are endless for photographing liquids. As Martin proves, it can even be a lucrative photography business! I don't know about you, but I've got a bunch of ideas running around in my head now! Time to go get the camera out. :)

How To Thrive As An Artist Without Selling Out:
The Unconventional Guide to Art and Money

Thursday, July 16, 2009

Canon DPP Workflow

I've had quite a few requests for my Canon DPP workflow, so here it is!

I've also made it available as a short eBook pdf which you can download for FREE.


Matt Ballard's Canon DPP Workflow

Import images by plugging your memory card into the computer. I use a Sandisk SDR-88 USB card reader. This is the current version.


Open windows explorer and find the your memory card in the directory tree.


Drag and drop the DCIM folder with your photos in it from the memory card to a location on your computer. I drag them to a folder named “Photos” on my data drive, so that's F:\Photos for me.

Once the DCIM folder is finished copying to your hard drive, check that all the files have copied correctly. Check the number of files is the same on both the memory card and in the new folder.

Rename the new folder to whatever you like by right-clicking the folder and clicking Rename from the drop-down menu. I use a date and description (i.e. “2009july11 Lilly”).

Open DPP. Make sure you're on the folder tab in the top left and find your new image folder in the directory tree.


Once you've found your new image folder, click on it and your images will appear as thumbnails in the main window.

Press the alt + a keys to select all the images, then the alt + q keys to open the quick check tool. If the quick check tool window doesn't open full screen, I drag the edges out so that the image fills my screen.

Use the left and right arrow keys to scroll through the images, keeping the cursor hovering over the 1 button. Assign a 1 to your keepers by clicking the 1 key as you scroll through. This can be done one handed or two handed, whichever you prefer, but it is very quick once you get the hang of it. I don't bother with the 2 and 3 ratings. I just put a 1 on anything that's a keeper.

Remember, while using the quick check tool you can double click anywhere on the image to zoom in.

When you're finished going through all the images and assigning a 1 to your keepers, go to the View drop down menu, click Sort, and click CheckMark1 from the drop down menu. Now all your keepers will be resorted to the top of the thumbnails in the main window

Press ctrl + alt + 1 to select all the keepers, then click the Edit Image Window icon in the top left corner of DPP.

The Edit Image Window should open with all a thumbnail strip of all your keepers along the left side of the first image.


NOTE: if you're editing an event like a wedding where you have hundreds or thousands of images, only select 25 to 50 images so that you're working on them in smaller batches at a time instead of using ctrl alt 1 to select all your keepers as DPP doesn't like to work on too many images at once. Alternately, select small groups of up to 50 images that are similar that you will want to copy and paste the same adjustments to.

Make your image adjustments to the first image using the editing controls on the right.

Now you can either move through each file making quick adjustments if your images differ from each other enough that you don't want to copy and paste adjustments, OR...

right click on the image and click copy recipe to clipboard from the pull down menu. Then click the main window icon in the top left to go back to the main window with all your thumbnails, select all the images that are similar to the one you just edited, right click and click Paste Recipe To Selected Image from the pull down menu.

Select your next image in a series, and repeat.

Once you have all the images edited, press ctrl + alt + 1 from the main window to select all your edited keepers, then click the batch process window, input your desired settings and click execute.

With my computer (quad core with 6GB of RAM) I can usually batch all my images, even a thousand or two with no trouble. If your computer has trouble doing this, try smaller batches at a time. Your computer may be able to handle running several smaller batches consecutively or you may have to run them seperately.

For more detailed information on what each of the settings and adjustments do in Canon DPP, Canon's DPP Manual is very good. Here's the link to Canon's Download Library.

Canon's DPP Online Tutorials are very good too. Here's the link.


Other Recommended Reading:

How To Thrive As An Artist Without Selling Out:
The Unconventional Guide to Art and Money

Wednesday, July 15, 2009

Nikon D700X vs Nikon D3X... A Look At The Advantages And Disadvantages Of Each

Here's what the specs of the Nikon D700X will likely be as compared to what the Nikon D3X specs are.

For me, the D700X holds a number of advantages over the D3X, in the same manner that the Nikon D700 held advantages over the Nikon D3.

I've highlighted what I consider the advantages to be in green and the disadvantages in red.

For others, the green and red might be reversed. Some prefer the larger, heavier Nikon D3X and Nikon D3 style bodies over the lighter, smaller Nikon D700X and Nikon D700 bodies.


Nikon D700X

Price: $4599.99 MSRP (my best guess)

Size: Width 6.3 in. (159.5mm) x Height 6.2 in. (157mm) x Depth 3.4 in. (87.5mm)

Weight: 43.0 oz. (1,220g)

Sensor Format: FX

Sensor Type: CMOS

Sensor Size: 35.9 x 24.0mm

Total Pixels: 25.72 million

Effective Pixels: 24.5 million

Shooting Speed: 5 frames per second

Sensor Cleaning: Yes (presumably, as they'd be stupid not to introduce it now with the D700X)

Video: HD Movie Mode (again, Nikon would be stupid not to include this on the D700X)

Built-In Flash: Yes

Battery: EN-EL3e


Nikon D3X

Price: $7999.99 MSRP

Size: Width 6.3 in. (159.5mm) x Height 6.2 in. (157mm) x Depth 3.4 in. (87.5mm)

Weight: 43.0 oz. (1,220g)

Sensor Format: FX

Sensor Type: CMOS

Sensor Size: 35.9 x 24.0mm

Total Pixels: 25.72 million

Effective Pixels: 24.5 million

Shooting Speed: 5 frames per second

Sensor Cleaning: No

Video: No

Built-In Flash: No

Battery: EN-EL4a / EN-EL4

Other Art of the Image posts on the D700X

Uncle Bob Leaks TOP SECRET Info On The Nikon D700X

How To Thrive As An Artist Without Selling Out:
The Unconventional Guide to Art and Money


Tuesday, July 14, 2009

Nikon VL1

What if Nikon surprised us all?

What if when August rolls around, instead of just the anticipated D3000 and D300s being the big news, they pulled the cover off a new larger than 35mm format camera called the Nikon VL1 (VL=VeryLarge).

The new Nikon VL1 is capable of using all the existing Nikon lenses, including the DX lenses in DX mode. Along with the new VL1, Nikon introduces a whole new line of VL1 lenses. That's why they've been slowly to market with some of the up-dates to the existing Nikon lens line-up. They've been busy designing and engineering the new series of VL lenses for the Nikon VL1.

The VL1 has a 50 Megapixel sensor, with an integrated solid state hard drive capable of holding over 250 full size, full resolution RAW image files from the VL1. The drive is removable, so you can have extras on hand, or up-grade it to a larger size as they become available.

The Nikon VL1's sensor is removable as well. This feature is specifically intended for making cleaning and servicing easier, but also makes one think Nikon is planning to introduce an up-graded sensor at a later point. The VL1 has user selectable RAW file sizes ranging from 6, 12, 18, 24, 36, and 50 Megapixels.

The VL1 has a built in Wi-fi transmitter, capable of tranferring images at previously unheard of speeds, making wireless image transfer almost as fast as writing to the VL1's solid state drive.

The VL1 has a revolutionary new auto focus system that is the most incredible thing ever to happen to auto focus. The VL1 tracks your eye movement and focuses on what you're looking at. The technology is absolutely incredible, and everyone that has tried it can't stop raving about it.

As a bonus, Nikon has included an entirely new software suite with the VL1. The new software is capable of rendering astonishing and previously unheard of enhancements to the VL1's RAW files, as well as doing Ultra High Quality RAW conversions.

To top it off, the workflow of this software is FAST. It makes Lightroom look slow and because Nikon has included it at no additional charge, it is sure to replace Lightroom for all Nikon shooters. To further this anticipated adoption rate, Nikon is making it available at no charge to all existing Nikon DSLR owners via download through the Nikon website.

Kudos to Nikon for not only fixing the workflow issues of their past software, but for taking a page from Google and making the software FREE.

The VL1 body will be available as of September 15, 2009, at an MSRP of $9,999.99 USD. Body and lens kit combinations will also be available at a cost savings of 5 to 10%.

What if?

(and until then, there's always the D700x to keep you happy :)

Monday, July 13, 2009

Uncle Bob's Top 5 Reasons Your Mother is a Better Photographer Than You

5. Mom doesn't pretend to know how to use her camera. She just pushes the little thingie-ma-bob and takes the picture. You'd miss it because you were playing with all the settings because you know more than Mom does about taking photos.

4. Mom takes pictures all the time of everyone she loves. You're too busy reading blogs about photography and trying to get all the latest rumours on what new cameras are coming out. Mom doesn't care about any of that, but she loves to take pictures of her kids, grandkids, family and friends.

3. Mom has a nice little camera she carries everywhere in her purse. When she sees something that catches her eye, she pulls out her little pocket camera and takes a picture. You would never shoot with a little point and shoot camera like Mom's. It's beneath you.

Of course, your camera is a little heavy, especially with all the lenses and flashes you need to take your amazing photos, so you don't take your camera out with you much. Usually just when you're getting paid for it. Hence, Mom gets tons more photos than you. Some aren't that great quality, but at least she got them!

2. Mom just takes a picture and then emails it or posts it on Facebook. She doesn't tinker with it. She doesn't spend hours in Photoshop trying out a million different actions. You know you can get a much better looking photo if you play with it a bit in Photoshop or Lightroom.

Of course, you hardly ever get that done and your photos sent out or posted because you're too busy playing with them, so everyone thinks Mom is a better photographer than you because they never see your photos.

1. She's your mother. Are you going to tell her you're better than her?


See you next Monday,
Uncle Bob


How To Thrive As An Artist Without Selling Out:
The Unconventional Guide to Art and Money

Announcing our new guest blogger...

none other than...


Uncle Bob from Uncle Bob's Photography!

Yes, that's right folks. We've managed to wrangle Uncle Bob himself into writing for us here at Art of the Image!

Uncle Bob has agreed to share with us some of the best of what he's learned about photography over the years, including tips on shooting, photographing difficult subject, how to deal with customers, what camera settings to use, and much, much more!

We're scheduling Uncle Bob into our Monday timeslot, so be sure to check in every Monday to see what Uncle Bob has to say!

P.S. If you'd like to write for Art of the Image, let us know. Email us with your article idea(s) and tell us a little about yourself.

Nikon D3000, Nikon D300s, and Nikon D400 Rumour Updates

Rumours are flying around the internet hot and heavy right now about a supposed leak of Nikon's 2009-2010 road map.

The anticipated Nikon D300s is being said to have the following upgrades:
- full HD - no surprise there
- improved AF - always welcome but I've got not complaints with my pair of D300's
- dual cards slots with the addition of an SD card - that's one CF and one SD - nice feature

Basically, I still see no reason why I'd buy a pair D300s bodies to replace my D300 bodies.

The newly noted Nikon D3000 appears to be the long awaited D40 replacement. From the specs I've seen, the D3000 is a stripped down D5000 with no HDMI input, microphone input, or articulated LCD display.

No big surprises here. The D3000 seems like it'll be a great replacement for the D40. In typical smart and logical Nikon style, the D3000 would appears to be built from Nikon's existing parts inventory, something they Nikon does quite a bit.

If the D3000 is sporting the D5000 / D90 sensor in a small, stripped down body, it could just be the best choice yet for a light-weight, compact DSLR. I'm thinking it would be a great, low-priced, low-light camera option with a Nikon 50mm f 1.8 on it. Hmmm....

On a kind of dissapointing note, the rumors I'm seeing about the Nikon D400 have it at 13.8 megapixels with a stop better high ISO noise. Again, this is nothing that would make me upgrade from my current pair of D300 bodies. The extra 1.8 megapixels is nothing, and one stop better high ISO is nice, but nothing to write home about.

But remember, these are all still just rumours.

My guess would be that the D3000 rumours are pretty accurate. Same for the Nikon D300s rumours.

Now the Nikon D400, I think it will be closer to my specs from my Stuff I Want From Nikon post.

And if none of these cameras do it for you, there's always the Nikon D700x. :)

In the meantime, it's fun to read the rumours, guess what will be coming, and wait in eager anticipation, isn't it!

How To Thrive As An Artist Without Selling Out:
The Unconventional Guide to Art and Money

Sunday, July 12, 2009

Have you had problems with your Canon DSLR?

Canon is known for many things, but Quality Control isn't one of them.

One of the best things about going back to Nikon was knowing the quality control was in an entirely different league than Canon's.

Those of you that have owned several Canon DSLR bodies probably know what I'm talking about. Some don't like to admit it, but most pro's who shoot Canon have had issues with quality control.

I know of some people whose Canon experiences read like a REALLY bad Jerry Springer episode (i.e. totally unbelievable).

One of the worst cases (but by no means an isolated case) is that of Neil van Niekerk, professional photographer, lighting guru, and author of the popular photography blog, www.planetneil.com.

Neil chronicles his crazy Canon experiences in a reply comment (Neil Said, April 28, 2009 11:19pm) about halfway through the comments section of his post, The Best Camera In The World.

Check out the pic of the table covered in receipts and paperwork for the HUGE list of Canon repairs he's had to have done.

Is Google Your Business Partner? GOOGLE BUSINESS MARKETING

Friday, July 10, 2009

Could this be the Nikon PEN I asked for?

Nikon Coolpix P1DX
Compact camera with DX 12.3 MPx sensor.
Hours outbreaks distance from 28 to 85 mm, f/3.5-5.6 speed, stabilization sensors,
2.9-inch LCD for the 920-dot, Výklopný, head-up viewfinder, the internal flash
Telepredsádka 1,8 x

The above specs for the Coolpix P1DX are from a supposedly “leaked” Nikon 2009-2010 roadmap posted over at Nikon Rumors.

The story goes that the roadmap was leaked from an IT company in the UK that handles some of Nikon's software. It was translated to English (hence the bad grammar).

There is also a slew of new lenses and DSLR bodies including the D3000, D300s, D4, D700x, and D400 outlined in the roadmap. Check it out over at Nikon Rumors.

Back to the Nikon Coolpix P1DX.

Is it possible?

Could the P1DX be the Nikon “PEN” that I talked about in my post “Where is the Nikon Digital PEN?

The fact that it appears to have the D90 / D5000 12.3 Megapixel sensor is a good start. The lens could stand to be a fair bit faster... say f2.8 to f4, or even a constant f2.8 if Nikon really wants to cause a stir.

I'm intrigued!

All we can do now is wait to see what announcements are made from Nikon.

Maybe we'll see some leaked pictures of the P1DX soon!

How To Thrive As An Artist Without Selling Out:
The Unconventional Guide to Art and Money

Wednesday, July 8, 2009

James Nachtwey's Incredible Witness Photography


Rwanda, 1994 - Survivor of Hutu death camp. James Nachtwey


"I have been a witness, and these pictures are

my testimony. The events I have recorded should

not be forgotten and must not be repeated."

-James Nachtwey-


A moving and profound statement that is an appropriate introduction to James' incredible portfolio entitled "Witness".

James is a true storyteller. His images are evocative, sometimes disturbing, but incredibly telling. They move you as you look through and reach out to touch your humanity, sometimes crying out to you of the inhumanity.

While these are stories that MUST be told, I can only imagine James' story behind the making of each image. I'm sure many of these were photos were taken at great personal risk to himself, and James obviously knows the meaning of the word dedication.

Quite a few other words come to mind when I look through James' photos... genuine, impact, horror, despair, grace... to name a few.

Kudos James.

Is Google Your Business Partner? GOOGLE BUSINESS MARKETING

Tuesday, July 7, 2009

Lightroom vs Canon DPP

Since I posted my Lightroom vs Nikon Capture / Nikon View article, I've had quite a few inquiries about my thoughts on Lightroom vs Canon's DPP (Digital Photo Professional) software.

I always liked DPP when I worked with it. It was very easy to work with (once you got the workflow figured out) and capable of delivering excellent quality RAW develops from Canon CR2 files. (for those that missed it, here's the link to my previous article on using Canon DPP.)

So I got to thinking that an actual comparison between Lightroom and DPP was in order.

Overall, my thoughts on comparing the RAW develops from each are very similar to the Lightroom vs Nikon comparison I did. In general, DPP does a better job right out of the gate with no tinkering.

You can get the same results, or very close, from Lightroom, but DPP provides a beautiful result right out of the camera as it were.

Between DPP and Lightroom, sometimes I liked the DPP file slightly better, and sometimes I liked the Lightroom file a little better. I used the Camera Standard profile in Lightroom, so the results were always pretty close (once I turned off my own presets).

That's the big thing that's changed since I used DPP a lot. Lightroom introduced camera profiles, and they do an excellent job of giving you the same or similar results as you would have got with a straight out of camera jpg or with the Canon software.

My conclusion here would be that DPP is great for quick and easy RAW to jpg conversions without having to tinker. Lightroom can take some tinkering to get an equally good result, but it's much better now that we have the camera profiles available.

Lightroom can match or come VERY close to Canon's DPP in quality when it comes to developing RAW CR2 Canon files. When it comes to workflow, speed, and versatility, Lightroom just blows Canon DPP away, although not as bad as it does Nikon. DPP is much more usable than the Nikon software.

Let's look at a couple images to see the results.

These are all from RAW files, developed as is with no adjustments (except a small exposure correction in a couple of them).

Lightroom 2 develops were set to Camera Standard as that was my default camera setting with my Canon DSLR's. DPP already defaults to the camera setting and does not need to be set in the software.

All the images have been saved at 800 pixels on the long side. The images aren't posted for pixel-peeping, only to show the basic differences between the Lightroom and DPP RAW develops. Please don't email with complaints about pure testing methods and such... that's not why I posted these.


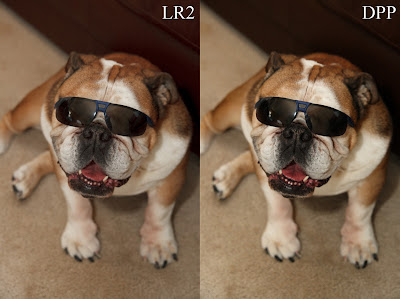
Here's my bulldog Hyla, posing for the camera (Canon 30D) with a pair of sunglasses on. In this instance, DPP rendered the contrast and tones a little punchier than Lightroom did.

I actually like the DPP shot better, but I can get the same thing out of Lightroom very easily. For a quick and easy develop with no tinkering, I have to say DPP beat Lightroom here.


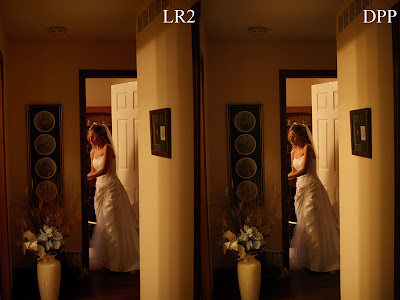
Here's a shot of a bride from a wedding I shot with a Canon 20D. Both are very similar, but I have to give the edge to the DPP develop.

Again, I could've got the same look in Lightroom very quickly, but DPP rendered this beautifully with no tinkering.


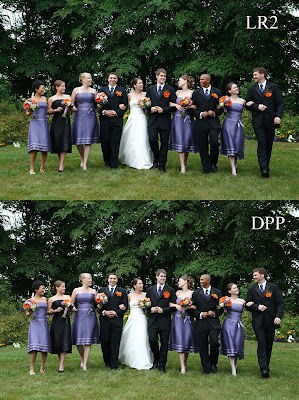
This bridal party shot (Canon Rebel XTi) is so close I almost wouldn't call a winner.

On close inspection in Photoshop, I'm going to give a slight nod to DPP, but it's so close it's probably more appropriate to call it a draw. Lightroom does an excellent job here.


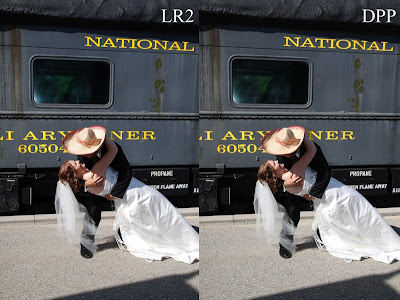
This shot (Canon Rebel XTi) of a bride and groom with a train in the background is a tie. I can't even tell the difference in Photoshop without really studying it. Even then, neither is better than the other. Lightroom matches DPP quality here.


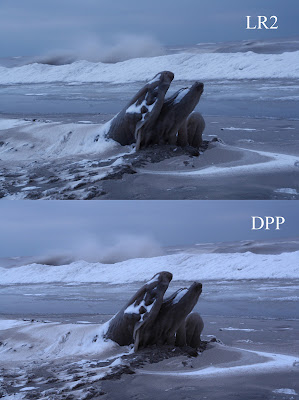
This photo of the Lake Erie shoreline in winter (Canon 30D) is, again, very close. I actually think Lightroom won this one by a slight margin, because I prefer the detail rendering Lightroom did, especially in the log on the shore.

Again though, they're so close it's hard to call a winner. Lightroom does a great job with color and kudos for the better detail rendering.

It's worth noting that DPP doesn't demand as much from your computer as Lightroom does. Lightroom likes as much power as you can give it, while DPP runs quite comfortably on a less than top of the line machine.

DPP is a valid alternative to Lightroom if you don't want to spend the money on Lightroom. Workflow isn't as good or as fast as Lightroom's, but it's still very usable. I used to use DPP as my primary RAW conversion software for a year or more.

If you're a Lightroom convert like myself, consider using DPP when you're having trouble getting an image just right in Lightroom. You may be surprised how good it looks in DPP without having to make any adjustments at all.

Feel free to post a comment and let me know your experiences with DPP.

If you don't have Adobe Photoshop Lightroom 2, Amazon usually has the best price.


See you behind the camera!

Matt

Canon DPP Workflow & FREE E-book

How to Thrive as an Artist Without Selling Out:
The Unconventional Guide to Art and Money