Hi Matt My husband has a Nikon D200 and we are currently using Lightroom 2.2. He shoots in RAW. The problem is that when he imports into Lightroom the colours turn dull and sometimes greenish and dark. How do you mange your workflow?? Do you import into Nikon transfer and then into Lightroom or how do you maintain the colours you see on your LCD screen? Any assistance would be greatly appreciated. We have been trying to figure this out for 10 months and are thoroughly frustrated. Jodie
I've heard this complaint many times, and I've had a lot of people ask me how to fix it.
The basic problem is one of presets and profiles. When you look at the image on the back of your camera's LCD, you're seeing the image as it would look as a processed-in-camera jpg, regardless of whether you're shooting RAW or not.
When you look at the same RAW file on your computer in Lightroom, your viewing the file as you've told Lightroom to show it to you. If you haven't given Lightroom any instructions on how you want to see your RAW files, it is most likely defaulting to the Adobe Standard profile, which is why your image doesn't look anything like what it did on the back of your camera.
This isn't a bad thing. You can change it easily. Like any piece of powerful software, Lightroom has a lot of versatility in what you can do, and this is one of the first steps you should take in your Lightroom Workflow when you import photos.
It's an easy step, and you can set Lightroom to default to your new preferences so that Lightroom will apply them automatically when you import photos, saving you time and making sure that your photos always look like they did on your camera LCD (if that's what you want).
The key to this step in your Lightroom Workflow is the Lightroom Camera Profiles. With the introduction of the Lightroom Camera Profiles, Adobe made things REALLY easy when it comes to getting your photos to look like they did in camera.
To select a Lightroom Camera Profile, make sure you're in the Lightroom Develop Module. Click on the Camera Calibration menu at the bottom of the list below Vignettes.
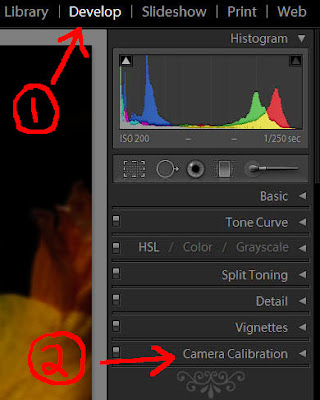
Now you should see the Profile field at the top just below the Camera Calibration Menu.
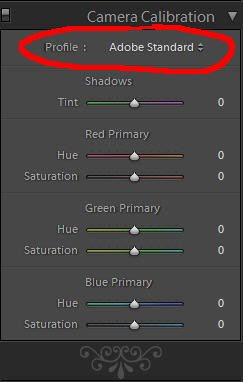
Click on the little arrows to the right of where it says Adobe Standard, and you should see this drop down menu.
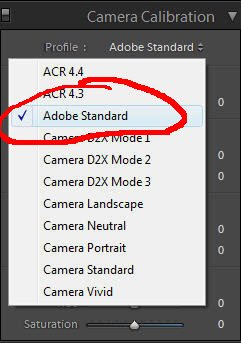
Select the Camera Profile that matches what your camera is set to by clicking on the profile. For me, that's usually Camera Vivid. My screen now looks like this.
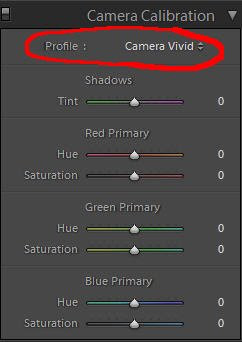
If you've selected a different profile, your screen should show the one you've selected.
Now the next step is to make this a preset so that we can apply it when we import photos, saving ourselves a lot of time and making our Lightroom Workflow more efficient. You can just apply it to the first photo and then use "Sync" to apply it to all the rest, but that's not terribly efficient. Applying it when you import photos is much better.
In the top left under Presets, click the little plus sign.
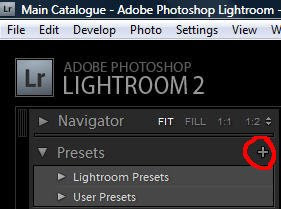
You should see this menu now.
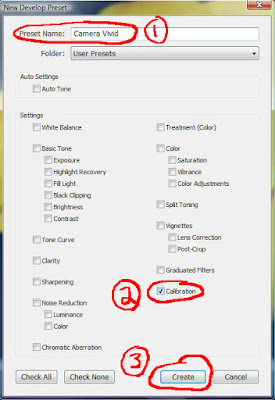
1. Name your preset. I named mine Camera Vivid.
2. Make sure Calibration is the only box checked. The easy way to do this is to click the Check None box and then click on Calibration.
3. Click Create.
You should now have a Camera Vivid (or whatever you named your preset) showing under the User Presets.

Now, when you import photos into Lightroom, you can apply your new camera profile preset automatically. When the Import Photos window opens, you can select your camera profile preset you just made under the Develop Settings drop down menu, and it will be applied to all your photos as they're imported.
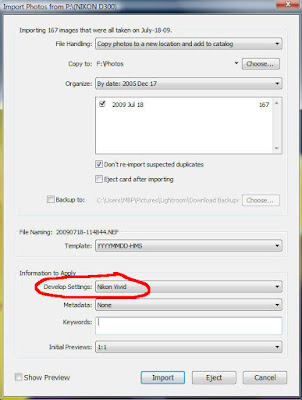
You can make as many camera profile presets as you want. If you use more than one camera profile regularly, creating a preset for each one you use will speed up your Lightroom Workflow even more. Just apply whichever you want when you import photos into Lightroom.
If you don't have Adobe Photoshop Lightroom 2
How To Thrive As An Artist Without Selling Out:
The Unconventional Guide to Art and Money
1 comment:
If you have already imported the photos and you want to apply "Camera Standard" to all of them... however, you forgot to do this on import ... is there a way to apply this to all images after you have imported them without doing them one by one? Great post by the way.
Pat
Post a Comment