I've also made it available as a short eBook pdf which you can download for FREE.
Matt Ballard's Canon DPP Workflow
Import images by plugging your memory card into the computer. I use a Sandisk SDR-88 USB card reader. This is the current version.
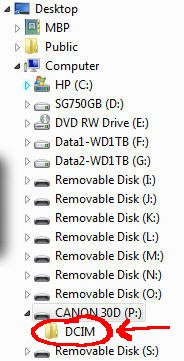
Open windows explorer and find the your memory card in the directory tree.

Drag and drop the DCIM folder with your photos in it from the memory card to a location on your computer. I drag them to a folder named “Photos” on my data drive, so that's F:\Photos for me.
Once the DCIM folder is finished copying to your hard drive, check that all the files have copied correctly. Check the number of files is the same on both the memory card and in the new folder.
Rename the new folder to whatever you like by right-clicking the folder and clicking Rename from the drop-down menu. I use a date and description (i.e. “2009july11 Lilly”).
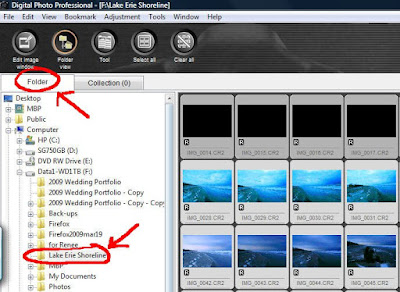
Open DPP. Make sure you're on the folder tab in the top left and find your new image folder in the directory tree.

Once you've found your new image folder, click on it and your images will appear as thumbnails in the main window.
Press the alt + a keys to select all the images, then the alt + q keys to open the quick check tool. If the quick check tool window doesn't open full screen, I drag the edges out so that the image fills my screen.
Use the left and right arrow keys to scroll through the images, keeping the cursor hovering over the 1 button. Assign a 1 to your keepers by clicking the 1 key as you scroll through. This can be done one handed or two handed, whichever you prefer, but it is very quick once you get the hang of it. I don't bother with the 2 and 3 ratings. I just put a 1 on anything that's a keeper.
Remember, while using the quick check tool you can double click anywhere on the image to zoom in.
When you're finished going through all the images and assigning a 1 to your keepers, go to the View drop down menu, click Sort, and click CheckMark1 from the drop down menu. Now all your keepers will be resorted to the top of the thumbnails in the main window
Press ctrl + alt + 1 to select all the keepers, then click the Edit Image Window icon in the top left corner of DPP.
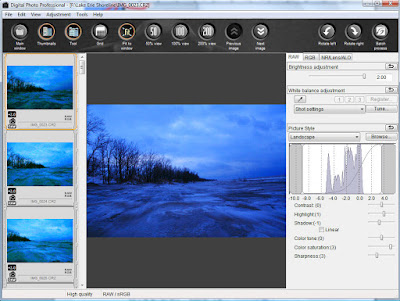
The Edit Image Window should open with all a thumbnail strip of all your keepers along the left side of the first image.

NOTE: if you're editing an event like a wedding where you have hundreds or thousands of images, only select 25 to 50 images so that you're working on them in smaller batches at a time instead of using ctrl alt 1 to select all your keepers as DPP doesn't like to work on too many images at once. Alternately, select small groups of up to 50 images that are similar that you will want to copy and paste the same adjustments to.
Make your image adjustments to the first image using the editing controls on the right.
Now you can either move through each file making quick adjustments if your images differ from each other enough that you don't want to copy and paste adjustments, OR...
right click on the image and click copy recipe to clipboard from the pull down menu. Then click the main window icon in the top left to go back to the main window with all your thumbnails, select all the images that are similar to the one you just edited, right click and click Paste Recipe To Selected Image from the pull down menu.
Select your next image in a series, and repeat.
Once you have all the images edited, press ctrl + alt + 1 from the main window to select all your edited keepers, then click the batch process window, input your desired settings and click execute.
With my computer (quad core with 6GB of RAM) I can usually batch all my images, even a thousand or two with no trouble. If your computer has trouble doing this, try smaller batches at a time. Your computer may be able to handle running several smaller batches consecutively or you may have to run them seperately.
For more detailed information on what each of the settings and adjustments do in Canon DPP, Canon's DPP Manual is very good. Here's the link to Canon's Download Library.
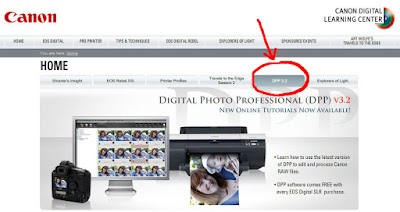
Canon's DPP Online Tutorials are very good too. Here's the link.

Other Recommended Reading:
How To Thrive As An Artist Without Selling Out:
The Unconventional Guide to Art and Money
1 comment:
Jay emailed me to ask...
I was trying to follow your dpp workflow but found that your description is only for those of the windows cult. When I tried to use quick check and click on the 1 tab, I couldn't get into the quick check mode. I also could not scroll through the images with the arrow keys.
I am on mac and assume the control keys are different. I am trying to find a faster way to do and edit than waiting on the large files to read in LR2. It takes me forever to scroll through the large images in LR2. I love the batch capabiities but standard editing is awful.
I read one thead where the guy said he did his main edit in dpp and then opened in LR2. I am not sure if he converted and saved his selects to another location or what. Any suggestions?
Thanks, Jay
Here's my reply...
Hi Jay,
Yes, I'm a Windows user. :) I've heard from my Mac friends that DPP doesn't play as nicely on the Mac.
Have you downloaded the DPP Mac user manual from the Canon site? It probably has all the Mac shortcuts.
Regarding LR, it's best to import all your photos, set LR to generate previews (I use 1:1 full size, but standard is faster), and then walk away for bit while it's chewing through the previews. Yes, LR takes a while to generate the previews, but once done, it should be very fast at scrolling through images.
A speed tip for scrolling images... LR is MUCH faster in Library mode than in Develop mode when it comes to scrolling through images. Not sure why this is, but it works. :)
If you're stilling have speed troubles after all the previews are generated, it's likely your computer may need more RAM or a faster chipset. I know LR is visibly slower on my laptop (Intel Core 2 Duo T6400 @ 2.0 GHz 4GB RAM 64 Bit Windows Vista) than it is on my desktop (Quad Core with 6GB RAM 64 Bit Windows Vista).
Hope this helps, Matt
Post a Comment