Showing posts with label Adobe Lightroom. Show all posts
Showing posts with label Adobe Lightroom. Show all posts
Wednesday, June 8, 2011
How to Edit This Canon T2i 550D Camera RAW File in Adobe Lightroom 3 - (Canon 50mm f1.8 Lens)
A Lightroom tutorial - How to Edit This Canon T2i 550D Camera RAW File in Adobe Lightroom 3 - (Shot with the Canon 50mm f1.8).
If you'd like to see me do a video on how I would edit one of your RAW files, or you'd like a photo critique of your photos, you can email them to theartoftheimage@gmail.com. No more than 5 per person please. :-)
Sign up NOW for our FREE VIP Newsletter at
http://www.artoftheimage.com/eBookSpecialOffer70.html and receive a 70% discount code for The Entrepreneur Who Went Viral!
Monday, May 23, 2011
How to Edit RAW Files in Lightroom - Quick Tips - How to Use AutoSync to Edit a Group of Photos
How to Edit RAW Files in Lightroom - Quick Tips - How to Use AutoSync to Edit a Group of Photos
If you'd like to see me do a video on how I would edit one of your RAW files, or you'd like a photo critique of your photos, you can email them to theartoftheimage@gmail.com. No more than 5 per person please. :-)
Get in on Exclusive Offers and Promotions as well as VIP Only Tips and Reviews! Sign up NOW for our FREE VIP Newsletter at
http://www.artoftheimage.com
Sunday, May 22, 2011
How to Edit RAW Files in Lightroom - Quick Tips - How to See Just Your Video Files
How to Edit RAW Files in Lightroom - Quick Tips - How to See Just Your Video Files
If you'd like to see me do a video on how I would edit one of your RAW files, or you'd like a photo critique of your photos, you can email them to theartoftheimage@gmail.com. No more than 5 per person please. :-)
Get in on Exclusive Offers and Promotions as well as VIP Only Tips and Reviews! Sign up NOW for our FREE VIP Newsletter at
http://www.artoftheimage.com
Saturday, May 21, 2011
How to Edit RAW Files in Lightroom - Quick Tip - Hiding the Side Panels for Maximum Viewing
How to Edit RAW Files in Lightroom - Quick Tip - Hiding the Side Panels for Maximum Viewing
If you'd like to see me do a video on how I would edit one of your RAW files, or you'd like a photo critique of your photos, you can email them to theartoftheimage@gmail.com. No more than 5 per person please. :-)
Thursday, May 19, 2011
How to Edit RAW Files in Lightroom - Applying Noise Reduction to a Nikon D7000 ISO 6400 Photo
How to Edit RAW Files in Lightroom - Applying Noise Reduction to a Nikon D7000 ISO 6400 Photo shot with the new Sigma 85mm f1.4
If you'd like to see me do a video on how I would edit one of your RAW files, or you'd like a photo critique of your photos, you can email them to theartoftheimage@gmail.com. No more than 5 per person please. :-)
Wednesday, May 18, 2011
How to Edit RAW Files in Lightroom - Quick Tip - Changing the Background Color Around Your Photo
How to Edit RAW Files in Lightroom - Quick Tip - Changing the Background Color Around Your Photo.
If you'd like to see me do a video on how I would edit one of your RAW files, or you'd like a photo critique of your photos, you can email them to theartoftheimage@gmail.com. No more than 5 per person please. :-)
Tuesday, May 17, 2011
Editing RAW Files in Adobe Lightroom - How to Get Your Photos to Look Like They Did On Your Camera
A lot of people ask me how to get their RAW files to look like they did on the back of the camera. They open them up in Lightroom or another RAW converter, and the image doesn't look like it did on their camera's LCD. Here's why that happens and how fix it.
If you'd like to see me do a video on how I would edit one of your RAW files, or you'd like a photo critique of your photos, you can email them to theartoftheimage@gmail.com. No more than 5 per person please. :-)
Monday, May 16, 2011
How to Get Maximum Highlight and Exposure Recovery from RAW Files in Lightroom 3
How to Get Maximum Highlight and Exposure Recovery from RAW Files in Lightroom 3.
If you'd like to see me do a video on how I would edit one of your RAW files, or you'd like a photo critique of your photos, you can email them to theartoftheimage@gmail.com. No more than 5 per person please. :-)
Friday, September 25, 2009
Developing Canon G10 RAW - Lightroom vs Canon DPP
I was fooling around with some photos I took with my Canon G10 at the Cambridge Fair, and I thought I'd run them through Canon DPP in addition to Lightroom, which I usually use for all my RAW developing.
As regular readers know, I'm a Lightroom lover, but I was just curious to see how the two sets of photos looked in comparison to each other. I didn't do any editing or adjustments. These are as shot.
Click on any of the photos to see a larger image.

Lightroom

Canon DPP
Pretty hard to see any difference here. Both look good, which is also a testament to the venerable little Canon G10 and P mode. Yes, I've been shooting the G10 in P mode a lot lately. It just works!

Lightroom

Canon DPP
This one I actually prefer the color rendering a little better on the Lightroom image, but again, it's so close, it's almost hard to tell them apart.

Lightroom

Canon DPP
Going to give the nod to the Canon DPP image on this one, mostly for shadow and mid tones. Again though, I'm splitting hairs. Both the Lightroom and the DPP images are very good and virtually identical.

Lightroom

Canon DPP

Lightroom

Canon DPP

Lightroom

Canon DPP
I think I like the Lightroom version of this one a little better for it's slightly warmer colors.

Lightroom

Canon DPP
I think this one goes to Canon DPP by a slight margin as I like the blue rendering a little better than Lightroom's, but again, splitting hairs here.

Lightroom

Canon DPP
Hard to call on this one. You decide. :-)

Lightroom

Canon DPP

Lightroom

Canon DPP
Slight edge to DPP on this one for color, but again, it's so close.
Overall, most of these are really virtually identical. There are subtle differences, but not enough to be identifiable by most people. All the images from both Canon DPP and Lightroom are excellent. I would have no problem using either to develop my Canon G10 RAW files from an image quality standpoint.
That said, the big difference again is that Lightroom is a much faster, much more powerful tool. I wouldn't think twice about it. I'd just use Lightroom and be done with it.
Of course, if you don't own Lightroom and aren't interested in purchasing it, well then this also proves that you won't be losing anything by way of image quality using Canon DPP, even if your workflow takes you a wee bit longer.
I should also mention that at this point, Lightroom has become so much more than just a RAW developer for me. I rarely take my images into Photoshop anymore. Lightroom has so many great tools that I use regularly (i.e. the clone tool, grad filters, vignetting), that I don't need Photoshop for the bulk of my images.
This is a major difference between Canon DPP and Lightroom. You don't get these kind of tools in DPP, so I'd be doing additional work in Photoshop if I was using DPP to develop my RAW files. With Lightroom, it's a one step solution! Not only is Lightroom faster, you can do so much more to finish your images than you can in DPP.
More on the Canon G10...
Shooting the G10 at ISO 800 and ISO 1600
Closeup Pics Using Macro Mode On the Canon G10
Mrs. Ballard Shoots The Canon G10 - Straight Out Of Camera Jpegs
Shooting the Canon G10 With An SB-26 Off Camera Flash
Canon G10 Unboxing & Why I Bought A Canon G10
5 Reasons To Sell Your Canon G10 And Buy A G11
Tuesday, July 28, 2009
Lightroom Tutorial - Lightroom Lights Out Viewing Mode
Here's a quick Lightroom tutorial on a great little Lightroom secret you might not know about, Lights Out Viewing Mode.
It's a great way to quickly check out how your photo looks without having any distractions clouding what you're seeing in Lightroom. I'll show you the Lightroom keyboard shortcuts too, so click the play button and enjoy!
If you haven't seen them, check out my other Lightroom Tutorials.
If you don't have Adobe Photoshop Lightroom 2 , Amazon usually has the best price.
It's a great way to quickly check out how your photo looks without having any distractions clouding what you're seeing in Lightroom. I'll show you the Lightroom keyboard shortcuts too, so click the play button and enjoy!
If you haven't seen them, check out my other Lightroom Tutorials.
If you don't have Adobe Photoshop Lightroom 2
Tuesday, July 21, 2009
Lightroom Workflow : Import Photos : How To Get Your Photos To Look Like They Did On Your Camera LCD
I received this email from a frustrated Lightroom user who can't get their photos to look like they did on the camera LCD after they import photos into Lightroom.
Hi Matt My husband has a Nikon D200 and we are currently using Lightroom 2.2. He shoots in RAW. The problem is that when he imports into Lightroom the colours turn dull and sometimes greenish and dark. How do you mange your workflow?? Do you import into Nikon transfer and then into Lightroom or how do you maintain the colours you see on your LCD screen? Any assistance would be greatly appreciated. We have been trying to figure this out for 10 months and are thoroughly frustrated. Jodie
I've heard this complaint many times, and I've had a lot of people ask me how to fix it.
The basic problem is one of presets and profiles. When you look at the image on the back of your camera's LCD, you're seeing the image as it would look as a processed-in-camera jpg, regardless of whether you're shooting RAW or not.
When you look at the same RAW file on your computer in Lightroom, your viewing the file as you've told Lightroom to show it to you. If you haven't given Lightroom any instructions on how you want to see your RAW files, it is most likely defaulting to the Adobe Standard profile, which is why your image doesn't look anything like what it did on the back of your camera.
This isn't a bad thing. You can change it easily. Like any piece of powerful software, Lightroom has a lot of versatility in what you can do, and this is one of the first steps you should take in your Lightroom Workflow when you import photos.
It's an easy step, and you can set Lightroom to default to your new preferences so that Lightroom will apply them automatically when you import photos, saving you time and making sure that your photos always look like they did on your camera LCD (if that's what you want).
The key to this step in your Lightroom Workflow is the Lightroom Camera Profiles. With the introduction of the Lightroom Camera Profiles, Adobe made things REALLY easy when it comes to getting your photos to look like they did in camera.
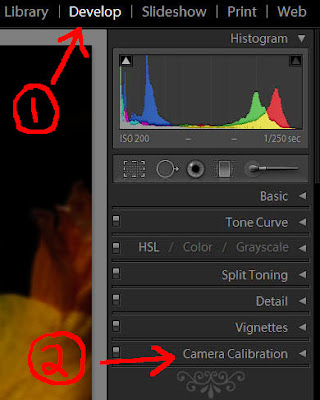
To select a Lightroom Camera Profile, make sure you're in the Lightroom Develop Module. Click on the Camera Calibration menu at the bottom of the list below Vignettes.
Now you should see the Profile field at the top just below the Camera Calibration Menu.
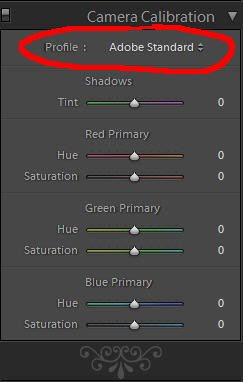
Click on the little arrows to the right of where it says Adobe Standard, and you should see this drop down menu.
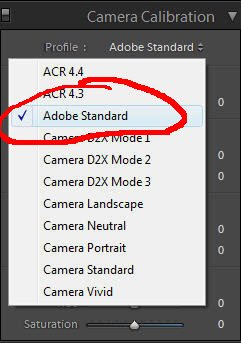
Select the Camera Profile that matches what your camera is set to by clicking on the profile. For me, that's usually Camera Vivid. My screen now looks like this.
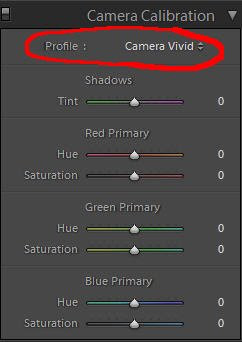
If you've selected a different profile, your screen should show the one you've selected.
Now the next step is to make this a preset so that we can apply it when we import photos, saving ourselves a lot of time and making our Lightroom Workflow more efficient. You can just apply it to the first photo and then use "Sync" to apply it to all the rest, but that's not terribly efficient. Applying it when you import photos is much better.
In the top left under Presets, click the little plus sign.

You should see this menu now.
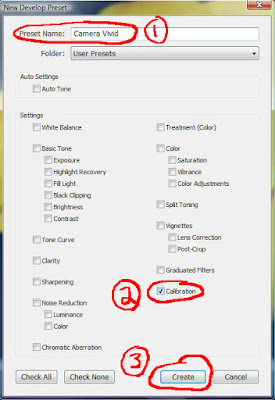
1. Name your preset. I named mine Camera Vivid.
2. Make sure Calibration is the only box checked. The easy way to do this is to click the Check None box and then click on Calibration.
3. Click Create.
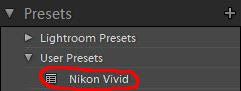
You should now have a Camera Vivid (or whatever you named your preset) showing under the User Presets.
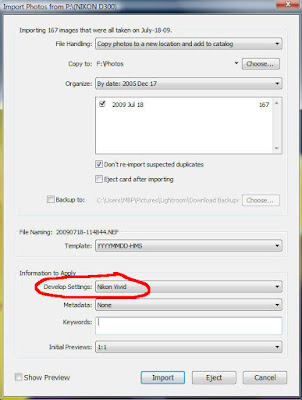
Now, when you import photos into Lightroom, you can apply your new camera profile preset automatically. When the Import Photos window opens, you can select your camera profile preset you just made under the Develop Settings drop down menu, and it will be applied to all your photos as they're imported.
You can make as many camera profile presets as you want. If you use more than one camera profile regularly, creating a preset for each one you use will speed up your Lightroom Workflow even more. Just apply whichever you want when you import photos into Lightroom.
If you don't have Adobe Photoshop Lightroom 2, Amazon usually has the best price.
How To Thrive As An Artist Without Selling Out:
The Unconventional Guide to Art and Money
Hi Matt My husband has a Nikon D200 and we are currently using Lightroom 2.2. He shoots in RAW. The problem is that when he imports into Lightroom the colours turn dull and sometimes greenish and dark. How do you mange your workflow?? Do you import into Nikon transfer and then into Lightroom or how do you maintain the colours you see on your LCD screen? Any assistance would be greatly appreciated. We have been trying to figure this out for 10 months and are thoroughly frustrated. Jodie
I've heard this complaint many times, and I've had a lot of people ask me how to fix it.
The basic problem is one of presets and profiles. When you look at the image on the back of your camera's LCD, you're seeing the image as it would look as a processed-in-camera jpg, regardless of whether you're shooting RAW or not.
When you look at the same RAW file on your computer in Lightroom, your viewing the file as you've told Lightroom to show it to you. If you haven't given Lightroom any instructions on how you want to see your RAW files, it is most likely defaulting to the Adobe Standard profile, which is why your image doesn't look anything like what it did on the back of your camera.
This isn't a bad thing. You can change it easily. Like any piece of powerful software, Lightroom has a lot of versatility in what you can do, and this is one of the first steps you should take in your Lightroom Workflow when you import photos.
It's an easy step, and you can set Lightroom to default to your new preferences so that Lightroom will apply them automatically when you import photos, saving you time and making sure that your photos always look like they did on your camera LCD (if that's what you want).
The key to this step in your Lightroom Workflow is the Lightroom Camera Profiles. With the introduction of the Lightroom Camera Profiles, Adobe made things REALLY easy when it comes to getting your photos to look like they did in camera.
To select a Lightroom Camera Profile, make sure you're in the Lightroom Develop Module. Click on the Camera Calibration menu at the bottom of the list below Vignettes.

Now you should see the Profile field at the top just below the Camera Calibration Menu.

Click on the little arrows to the right of where it says Adobe Standard, and you should see this drop down menu.

Select the Camera Profile that matches what your camera is set to by clicking on the profile. For me, that's usually Camera Vivid. My screen now looks like this.

If you've selected a different profile, your screen should show the one you've selected.
Now the next step is to make this a preset so that we can apply it when we import photos, saving ourselves a lot of time and making our Lightroom Workflow more efficient. You can just apply it to the first photo and then use "Sync" to apply it to all the rest, but that's not terribly efficient. Applying it when you import photos is much better.
In the top left under Presets, click the little plus sign.

You should see this menu now.

1. Name your preset. I named mine Camera Vivid.
2. Make sure Calibration is the only box checked. The easy way to do this is to click the Check None box and then click on Calibration.
3. Click Create.
You should now have a Camera Vivid (or whatever you named your preset) showing under the User Presets.

Now, when you import photos into Lightroom, you can apply your new camera profile preset automatically. When the Import Photos window opens, you can select your camera profile preset you just made under the Develop Settings drop down menu, and it will be applied to all your photos as they're imported.

You can make as many camera profile presets as you want. If you use more than one camera profile regularly, creating a preset for each one you use will speed up your Lightroom Workflow even more. Just apply whichever you want when you import photos into Lightroom.
If you don't have Adobe Photoshop Lightroom 2
How To Thrive As An Artist Without Selling Out:
The Unconventional Guide to Art and Money
Thursday, June 25, 2009
Lightroom Tutorial - Renaming Photo Folders During Import
Thought I'd share with you a quick Lightroom tip for renaming the folder you're importing your photos to right from the Import Photos Window in Lightroom.
Before I found out about this one, I used to import my photos, and then go the folder in Windows to rename it the way I wanted it. Now I just do it right from the Import Photos Window in Lightroom. It's quick and easy, and a big time saver.
If you don't have Adobe Photoshop Lightroom 2, Amazon usually has the best price.
s53u9imred
Before I found out about this one, I used to import my photos, and then go the folder in Windows to rename it the way I wanted it. Now I just do it right from the Import Photos Window in Lightroom. It's quick and easy, and a big time saver.
If you don't have Adobe Photoshop Lightroom 2
s53u9imred
Subscribe to:
Comments (Atom)