Showing posts with label Lightroom. Show all posts
Showing posts with label Lightroom. Show all posts
Sunday, May 22, 2011
How to Edit RAW Files in Lightroom - Quick Tips - How to See Just Your Video Files
How to Edit RAW Files in Lightroom - Quick Tips - How to See Just Your Video Files
If you'd like to see me do a video on how I would edit one of your RAW files, or you'd like a photo critique of your photos, you can email them to theartoftheimage@gmail.com. No more than 5 per person please. :-)
Get in on Exclusive Offers and Promotions as well as VIP Only Tips and Reviews! Sign up NOW for our FREE VIP Newsletter at
http://www.artoftheimage.com
Tuesday, July 28, 2009
Lightroom Tutorial - Lightroom Lights Out Viewing Mode
Here's a quick Lightroom tutorial on a great little Lightroom secret you might not know about, Lights Out Viewing Mode.
It's a great way to quickly check out how your photo looks without having any distractions clouding what you're seeing in Lightroom. I'll show you the Lightroom keyboard shortcuts too, so click the play button and enjoy!
If you haven't seen them, check out my other Lightroom Tutorials.
If you don't have Adobe Photoshop Lightroom 2 , Amazon usually has the best price.
It's a great way to quickly check out how your photo looks without having any distractions clouding what you're seeing in Lightroom. I'll show you the Lightroom keyboard shortcuts too, so click the play button and enjoy!
If you haven't seen them, check out my other Lightroom Tutorials.
If you don't have Adobe Photoshop Lightroom 2
Tuesday, July 21, 2009
Lightroom Workflow : Import Photos : How To Get Your Photos To Look Like They Did On Your Camera LCD
I received this email from a frustrated Lightroom user who can't get their photos to look like they did on the camera LCD after they import photos into Lightroom.
Hi Matt My husband has a Nikon D200 and we are currently using Lightroom 2.2. He shoots in RAW. The problem is that when he imports into Lightroom the colours turn dull and sometimes greenish and dark. How do you mange your workflow?? Do you import into Nikon transfer and then into Lightroom or how do you maintain the colours you see on your LCD screen? Any assistance would be greatly appreciated. We have been trying to figure this out for 10 months and are thoroughly frustrated. Jodie
I've heard this complaint many times, and I've had a lot of people ask me how to fix it.
The basic problem is one of presets and profiles. When you look at the image on the back of your camera's LCD, you're seeing the image as it would look as a processed-in-camera jpg, regardless of whether you're shooting RAW or not.
When you look at the same RAW file on your computer in Lightroom, your viewing the file as you've told Lightroom to show it to you. If you haven't given Lightroom any instructions on how you want to see your RAW files, it is most likely defaulting to the Adobe Standard profile, which is why your image doesn't look anything like what it did on the back of your camera.
This isn't a bad thing. You can change it easily. Like any piece of powerful software, Lightroom has a lot of versatility in what you can do, and this is one of the first steps you should take in your Lightroom Workflow when you import photos.
It's an easy step, and you can set Lightroom to default to your new preferences so that Lightroom will apply them automatically when you import photos, saving you time and making sure that your photos always look like they did on your camera LCD (if that's what you want).
The key to this step in your Lightroom Workflow is the Lightroom Camera Profiles. With the introduction of the Lightroom Camera Profiles, Adobe made things REALLY easy when it comes to getting your photos to look like they did in camera.
To select a Lightroom Camera Profile, make sure you're in the Lightroom Develop Module. Click on the Camera Calibration menu at the bottom of the list below Vignettes.
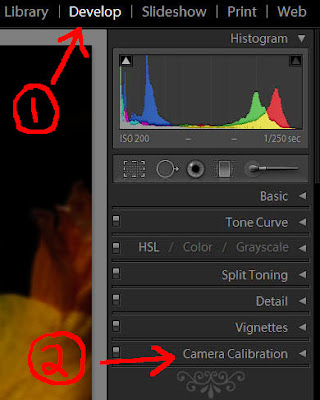
Now you should see the Profile field at the top just below the Camera Calibration Menu.
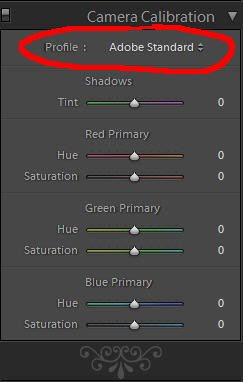
Click on the little arrows to the right of where it says Adobe Standard, and you should see this drop down menu.
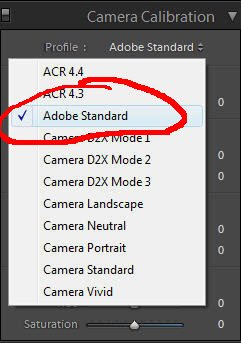
Select the Camera Profile that matches what your camera is set to by clicking on the profile. For me, that's usually Camera Vivid. My screen now looks like this.
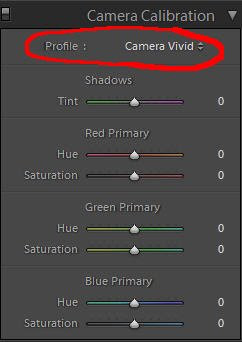
If you've selected a different profile, your screen should show the one you've selected.
Now the next step is to make this a preset so that we can apply it when we import photos, saving ourselves a lot of time and making our Lightroom Workflow more efficient. You can just apply it to the first photo and then use "Sync" to apply it to all the rest, but that's not terribly efficient. Applying it when you import photos is much better.
In the top left under Presets, click the little plus sign.

You should see this menu now.
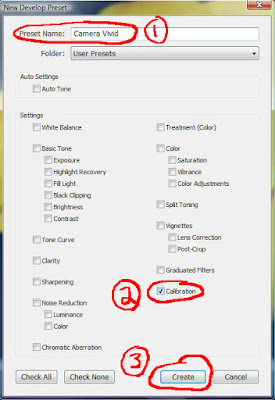
1. Name your preset. I named mine Camera Vivid.
2. Make sure Calibration is the only box checked. The easy way to do this is to click the Check None box and then click on Calibration.
3. Click Create.
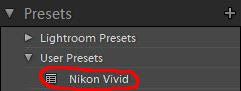
You should now have a Camera Vivid (or whatever you named your preset) showing under the User Presets.
Now, when you import photos into Lightroom, you can apply your new camera profile preset automatically. When the Import Photos window opens, you can select your camera profile preset you just made under the Develop Settings drop down menu, and it will be applied to all your photos as they're imported.
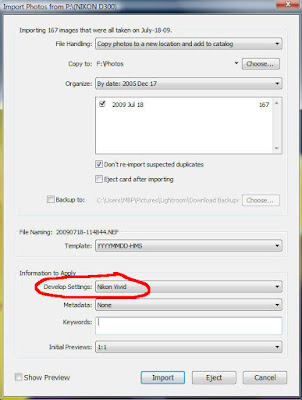
You can make as many camera profile presets as you want. If you use more than one camera profile regularly, creating a preset for each one you use will speed up your Lightroom Workflow even more. Just apply whichever you want when you import photos into Lightroom.
If you don't have Adobe Photoshop Lightroom 2, Amazon usually has the best price.
How To Thrive As An Artist Without Selling Out:
The Unconventional Guide to Art and Money
Hi Matt My husband has a Nikon D200 and we are currently using Lightroom 2.2. He shoots in RAW. The problem is that when he imports into Lightroom the colours turn dull and sometimes greenish and dark. How do you mange your workflow?? Do you import into Nikon transfer and then into Lightroom or how do you maintain the colours you see on your LCD screen? Any assistance would be greatly appreciated. We have been trying to figure this out for 10 months and are thoroughly frustrated. Jodie
I've heard this complaint many times, and I've had a lot of people ask me how to fix it.
The basic problem is one of presets and profiles. When you look at the image on the back of your camera's LCD, you're seeing the image as it would look as a processed-in-camera jpg, regardless of whether you're shooting RAW or not.
When you look at the same RAW file on your computer in Lightroom, your viewing the file as you've told Lightroom to show it to you. If you haven't given Lightroom any instructions on how you want to see your RAW files, it is most likely defaulting to the Adobe Standard profile, which is why your image doesn't look anything like what it did on the back of your camera.
This isn't a bad thing. You can change it easily. Like any piece of powerful software, Lightroom has a lot of versatility in what you can do, and this is one of the first steps you should take in your Lightroom Workflow when you import photos.
It's an easy step, and you can set Lightroom to default to your new preferences so that Lightroom will apply them automatically when you import photos, saving you time and making sure that your photos always look like they did on your camera LCD (if that's what you want).
The key to this step in your Lightroom Workflow is the Lightroom Camera Profiles. With the introduction of the Lightroom Camera Profiles, Adobe made things REALLY easy when it comes to getting your photos to look like they did in camera.
To select a Lightroom Camera Profile, make sure you're in the Lightroom Develop Module. Click on the Camera Calibration menu at the bottom of the list below Vignettes.

Now you should see the Profile field at the top just below the Camera Calibration Menu.

Click on the little arrows to the right of where it says Adobe Standard, and you should see this drop down menu.

Select the Camera Profile that matches what your camera is set to by clicking on the profile. For me, that's usually Camera Vivid. My screen now looks like this.

If you've selected a different profile, your screen should show the one you've selected.
Now the next step is to make this a preset so that we can apply it when we import photos, saving ourselves a lot of time and making our Lightroom Workflow more efficient. You can just apply it to the first photo and then use "Sync" to apply it to all the rest, but that's not terribly efficient. Applying it when you import photos is much better.
In the top left under Presets, click the little plus sign.

You should see this menu now.

1. Name your preset. I named mine Camera Vivid.
2. Make sure Calibration is the only box checked. The easy way to do this is to click the Check None box and then click on Calibration.
3. Click Create.
You should now have a Camera Vivid (or whatever you named your preset) showing under the User Presets.

Now, when you import photos into Lightroom, you can apply your new camera profile preset automatically. When the Import Photos window opens, you can select your camera profile preset you just made under the Develop Settings drop down menu, and it will be applied to all your photos as they're imported.

You can make as many camera profile presets as you want. If you use more than one camera profile regularly, creating a preset for each one you use will speed up your Lightroom Workflow even more. Just apply whichever you want when you import photos into Lightroom.
If you don't have Adobe Photoshop Lightroom 2
How To Thrive As An Artist Without Selling Out:
The Unconventional Guide to Art and Money
Tuesday, July 7, 2009
Lightroom vs Canon DPP
Since I posted my Lightroom vs Nikon Capture / Nikon View article, I've had quite a few inquiries about my thoughts on Lightroom vs Canon's DPP (Digital Photo Professional) software.
I always liked DPP when I worked with it. It was very easy to work with (once you got the workflow figured out) and capable of delivering excellent quality RAW develops from Canon CR2 files. (for those that missed it, here's the link to my previous article on using Canon DPP.)
So I got to thinking that an actual comparison between Lightroom and DPP was in order.
Overall, my thoughts on comparing the RAW develops from each are very similar to the Lightroom vs Nikon comparison I did. In general, DPP does a better job right out of the gate with no tinkering.
You can get the same results, or very close, from Lightroom, but DPP provides a beautiful result right out of the camera as it were.
Between DPP and Lightroom, sometimes I liked the DPP file slightly better, and sometimes I liked the Lightroom file a little better. I used the Camera Standard profile in Lightroom, so the results were always pretty close (once I turned off my own presets).
That's the big thing that's changed since I used DPP a lot. Lightroom introduced camera profiles, and they do an excellent job of giving you the same or similar results as you would have got with a straight out of camera jpg or with the Canon software.
My conclusion here would be that DPP is great for quick and easy RAW to jpg conversions without having to tinker. Lightroom can take some tinkering to get an equally good result, but it's much better now that we have the camera profiles available.
Lightroom can match or come VERY close to Canon's DPP in quality when it comes to developing RAW CR2 Canon files. When it comes to workflow, speed, and versatility, Lightroom just blows Canon DPP away, although not as bad as it does Nikon. DPP is much more usable than the Nikon software.
Let's look at a couple images to see the results.
These are all from RAW files, developed as is with no adjustments (except a small exposure correction in a couple of them).
Lightroom 2 develops were set to Camera Standard as that was my default camera setting with my Canon DSLR's. DPP already defaults to the camera setting and does not need to be set in the software.
All the images have been saved at 800 pixels on the long side. The images aren't posted for pixel-peeping, only to show the basic differences between the Lightroom and DPP RAW develops. Please don't email with complaints about pure testing methods and such... that's not why I posted these.
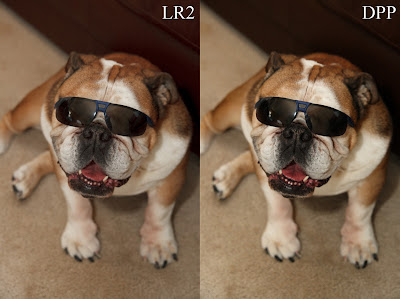
Here's my bulldog Hyla, posing for the camera (Canon 30D) with a pair of sunglasses on. In this instance, DPP rendered the contrast and tones a little punchier than Lightroom did.
I actually like the DPP shot better, but I can get the same thing out of Lightroom very easily. For a quick and easy develop with no tinkering, I have to say DPP beat Lightroom here.
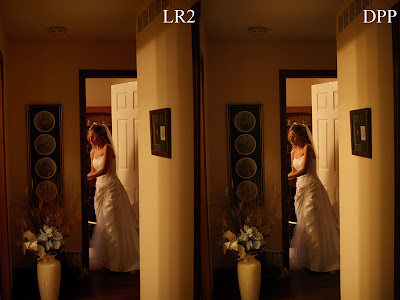
Here's a shot of a bride from a wedding I shot with a Canon 20D. Both are very similar, but I have to give the edge to the DPP develop.
Again, I could've got the same look in Lightroom very quickly, but DPP rendered this beautifully with no tinkering.
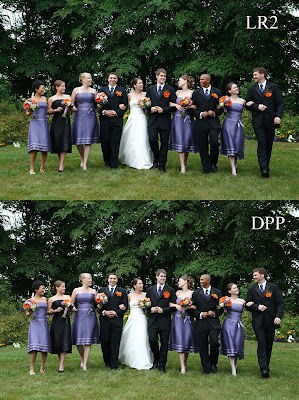
This bridal party shot (Canon Rebel XTi) is so close I almost wouldn't call a winner.
On close inspection in Photoshop, I'm going to give a slight nod to DPP, but it's so close it's probably more appropriate to call it a draw. Lightroom does an excellent job here.
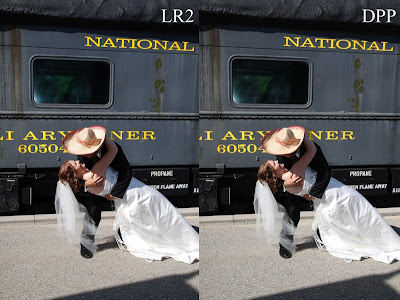
This shot (Canon Rebel XTi) of a bride and groom with a train in the background is a tie. I can't even tell the difference in Photoshop without really studying it. Even then, neither is better than the other. Lightroom matches DPP quality here.
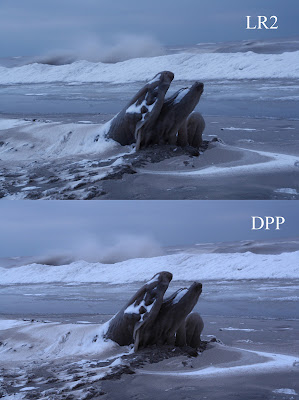
This photo of the Lake Erie shoreline in winter (Canon 30D) is, again, very close. I actually think Lightroom won this one by a slight margin, because I prefer the detail rendering Lightroom did, especially in the log on the shore.
Again though, they're so close it's hard to call a winner. Lightroom does a great job with color and kudos for the better detail rendering.
It's worth noting that DPP doesn't demand as much from your computer as Lightroom does. Lightroom likes as much power as you can give it, while DPP runs quite comfortably on a less than top of the line machine.
DPP is a valid alternative to Lightroom if you don't want to spend the money on Lightroom. Workflow isn't as good or as fast as Lightroom's, but it's still very usable. I used to use DPP as my primary RAW conversion software for a year or more.
If you're a Lightroom convert like myself, consider using DPP when you're having trouble getting an image just right in Lightroom. You may be surprised how good it looks in DPP without having to make any adjustments at all.
Feel free to post a comment and let me know your experiences with DPP.
If you don't have Adobe Photoshop Lightroom 2, Amazon usually has the best price.
See you behind the camera!
Matt
Canon DPP Workflow & FREE E-book
How to Thrive as an Artist Without Selling Out:
The Unconventional Guide to Art and Money
I always liked DPP when I worked with it. It was very easy to work with (once you got the workflow figured out) and capable of delivering excellent quality RAW develops from Canon CR2 files. (for those that missed it, here's the link to my previous article on using Canon DPP.)
So I got to thinking that an actual comparison between Lightroom and DPP was in order.
Overall, my thoughts on comparing the RAW develops from each are very similar to the Lightroom vs Nikon comparison I did. In general, DPP does a better job right out of the gate with no tinkering.
You can get the same results, or very close, from Lightroom, but DPP provides a beautiful result right out of the camera as it were.
Between DPP and Lightroom, sometimes I liked the DPP file slightly better, and sometimes I liked the Lightroom file a little better. I used the Camera Standard profile in Lightroom, so the results were always pretty close (once I turned off my own presets).
That's the big thing that's changed since I used DPP a lot. Lightroom introduced camera profiles, and they do an excellent job of giving you the same or similar results as you would have got with a straight out of camera jpg or with the Canon software.
My conclusion here would be that DPP is great for quick and easy RAW to jpg conversions without having to tinker. Lightroom can take some tinkering to get an equally good result, but it's much better now that we have the camera profiles available.
Lightroom can match or come VERY close to Canon's DPP in quality when it comes to developing RAW CR2 Canon files. When it comes to workflow, speed, and versatility, Lightroom just blows Canon DPP away, although not as bad as it does Nikon. DPP is much more usable than the Nikon software.
Let's look at a couple images to see the results.
These are all from RAW files, developed as is with no adjustments (except a small exposure correction in a couple of them).
Lightroom 2 develops were set to Camera Standard as that was my default camera setting with my Canon DSLR's. DPP already defaults to the camera setting and does not need to be set in the software.
All the images have been saved at 800 pixels on the long side. The images aren't posted for pixel-peeping, only to show the basic differences between the Lightroom and DPP RAW develops. Please don't email with complaints about pure testing methods and such... that's not why I posted these.

Here's my bulldog Hyla, posing for the camera (Canon 30D) with a pair of sunglasses on. In this instance, DPP rendered the contrast and tones a little punchier than Lightroom did.
I actually like the DPP shot better, but I can get the same thing out of Lightroom very easily. For a quick and easy develop with no tinkering, I have to say DPP beat Lightroom here.

Here's a shot of a bride from a wedding I shot with a Canon 20D. Both are very similar, but I have to give the edge to the DPP develop.
Again, I could've got the same look in Lightroom very quickly, but DPP rendered this beautifully with no tinkering.

This bridal party shot (Canon Rebel XTi) is so close I almost wouldn't call a winner.
On close inspection in Photoshop, I'm going to give a slight nod to DPP, but it's so close it's probably more appropriate to call it a draw. Lightroom does an excellent job here.

This shot (Canon Rebel XTi) of a bride and groom with a train in the background is a tie. I can't even tell the difference in Photoshop without really studying it. Even then, neither is better than the other. Lightroom matches DPP quality here.

This photo of the Lake Erie shoreline in winter (Canon 30D) is, again, very close. I actually think Lightroom won this one by a slight margin, because I prefer the detail rendering Lightroom did, especially in the log on the shore.
Again though, they're so close it's hard to call a winner. Lightroom does a great job with color and kudos for the better detail rendering.
It's worth noting that DPP doesn't demand as much from your computer as Lightroom does. Lightroom likes as much power as you can give it, while DPP runs quite comfortably on a less than top of the line machine.
DPP is a valid alternative to Lightroom if you don't want to spend the money on Lightroom. Workflow isn't as good or as fast as Lightroom's, but it's still very usable. I used to use DPP as my primary RAW conversion software for a year or more.
If you're a Lightroom convert like myself, consider using DPP when you're having trouble getting an image just right in Lightroom. You may be surprised how good it looks in DPP without having to make any adjustments at all.
Feel free to post a comment and let me know your experiences with DPP.
If you don't have Adobe Photoshop Lightroom 2
See you behind the camera!
Matt
Canon DPP Workflow & FREE E-book
How to Thrive as an Artist Without Selling Out:
The Unconventional Guide to Art and Money
Thursday, June 25, 2009
Lightroom Tutorial - Renaming Photo Folders During Import
Thought I'd share with you a quick Lightroom tip for renaming the folder you're importing your photos to right from the Import Photos Window in Lightroom.
Before I found out about this one, I used to import my photos, and then go the folder in Windows to rename it the way I wanted it. Now I just do it right from the Import Photos Window in Lightroom. It's quick and easy, and a big time saver.
If you don't have Adobe Photoshop Lightroom 2, Amazon usually has the best price.
s53u9imred
Before I found out about this one, I used to import my photos, and then go the folder in Windows to rename it the way I wanted it. Now I just do it right from the Import Photos Window in Lightroom. It's quick and easy, and a big time saver.
If you don't have Adobe Photoshop Lightroom 2
s53u9imred
Saturday, May 23, 2009
Lightroom vs NikonViewNX Sample Images
Here's some sample images developed in Nikon's ViewNX and Adobe's Lightroom 2.
They are all from RAW files, developed as is with no adjustments (except a small exposure correction in the first image). The first pair of images and last pair of images have been cropped in Photoshop for esthetic presentation. The white tiger pair of images are the original frames, no crop.
Lightroom 2 develops were set to Camera Vivid as that is my default camera setting. ViewNX reads this automatically as the camera setting and does not need to be set in the software.
All the images have been saved at 800 pixels wide and compressed for web in Photoshop (save for web - high). The images are not intended for pixel-peeping of ultimate quality, but rather to show the differences between the two RAW developing softwares. Please don't email with complaints about pure testing methods and such... that's not why I posted these.
Lastly, I've used Nikon ViewNX and not CaptureNX, simply because it was easier. The results should be the same from a straight ooc conversion.
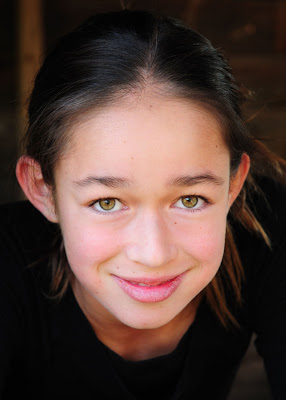
Nikon ViewNX
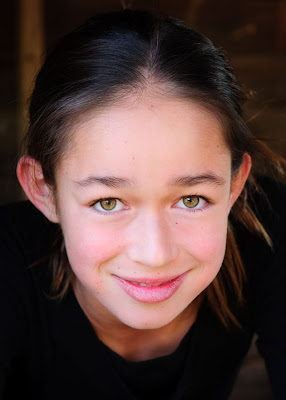
Lightroom 2
This first pair of images is not the usual result I see when I do these Lightroom vs ViewNX comparisons. I actually like the color and overall look of the Lightroom jpg better. Detail rendering is similar, but there are visual differences even with these jpgs compressed for web. The Nikon jpg has better detail in the hair and sides of the head.

Nikon ViewNX

Lightroom 2
The white tiger images show what I usually see between Nikon and Lightroom RAW develops. I prefer the color and overall look of the Nikon jpg. Again, they're both very close, but the ViewNX jpg just looks a little bit better. The ViewNX jpg also has more detail visible, especially around the eye and the bridge of the nose.

Nikon ViewNX

Lightroom 2
Like the white tiger, this pair of images show again what I usually see in Nikon versus Lightroom RAW develop comparisons. The Nikon jpg gets the nod. Detail, color and overall look is better in the ViewNX jpg.
Again, the differences are not huge, but they are there. You can see them clearly even in these web-size jpgs. The differences are even more visible in the full-size jpgs. Granted, color and overall look are subjective determinations, but detail is not. Could I tweak the detail in Lightroom using sharpening and clarity? Probably. I could probably get it close, but I doubt I could match it exactly. Remember, these are straight out of ViewNX with no adjustments. I didn't have to spend time tweaking.
Food for thought.
Lightroom versus Nikon Capture / Nikon View

Let me start off by saying, I love Adobe Photoshop Lightroom 2

I say pretty much because occasionally I like the color of an out-of-camera (OOC) jpg better than the Lightroom version of the same image from RAW. This doesn't occur very often, so it's not a big deal. I just mentioned it because if I'm having a hard time with the RAW file, sometimes a quick conversion using Nikon ViewNX is the easiest solution.
Of course, if you are able to shoot perfectly so that you never need to touch an image in post-editing, then a jpg workflow is obviously the best for you. I say this tongue in cheek, because while I enjoy shooting RAW+jpg so that I have the jpg ready to use right way, there isn't very often that I don't want to work on an image in post, especially if I'm shooting for work (i.e. a wedding, a portrait shoot, commercial work, etc.).
I still see it said fairly frequently that the easiest solution to a fast efficient workflow is to shoot it right in camera and not have to work on it in post. While this is great in theory, it doesn't hold up in reality. Most of the time when I see someone espousing this type of thinking, I look at the images they're using as examples, and I immediately see how I would've worked on them in post. Maybe I'm just picky, but I want my work to look the best it can, and that usually means I want to work on it in post. It's not that an image doesn't look good straight out of camera, it's that it can look better.
Think of it in film terms from the "old" days. You'd have a negative or slide of a great shot, which, in the hands of a GREAT printer, makes a beautiful print (when I say printer, I'm talking about a artisan who has mastered the art of making a print... not a piece of hardware). The negative or slide was great, and the finished print is a masterpiece.
Same thing with jpg versus RAW. The jpg is like a print, where the RAW file is like the negative or slide. The jpg can be great, but what you see is pretty much what you get. There isn't a lot of latitude to work on it. A RAW file has MUCH more latitude for working it, and the therefore the print has more potential.
And that's where Lightroom shines. The power of RAW developing that Lightroom offers is hard to beat. You can even work on jpgs in Lightroom, although I've found that when I compare them head to head, the RAW file looks better about 99% of the time after editing in Lightroom. Jpg files just don't stand up as well when it comes to editing as RAW files dodoes.
But the title of this post is "Lightroom versus Nikon Capture or Nikon View", isn't it. :)

Well, periodically I open up Nikon CaptureNX or Nikon ViewNX and run a few conversions just to compare the results against Lightroom. Most of the time, it's a draw. Lightroom color is now pretty much the same as CaptureNX or ViewNX now that Lightroom has camera profiles. Once in a while though, I find an image that I just like better OOC or processed through Nikon software. Usually the color just looks a bit better, or the contrast or saturation just looks better.
What is interesting though, is that more often than not, the thing I do notice is the images out of Nikon ViewNX (I usually use ViewNX as it's faster and easier to do a quick RAW develop in ViewNX than it is in CaptureNX), have better fine detail. The Nikon software (whether in camera, or using Capture or View) just seems to have a slight edge in how it renders an image. This isn't surprising really when you think that Nikon should be able to get the most out of their image files... after all, they wrote the coding for them.
I'm not talking earth-shattering differences here. Most of the time it's subtle. Sometimes, it's more noticeable, but it's still not a drastic difference. Most of all, it's never enough of a difference that I would suffer the Nikon software workflow instead of using Lightroom.
That is the biggest difference between Lightroom and Nikon CaptureNX or Nikon ViewNX. The Nikon software is absolutely intolerable from a workflow standpoint. It's slow and sluggish, and whoever designed it obviously has never had to sit down and edit a thousand or more images from a wedding. Even working on a smaller shoot of a hundred or two images is painful with the Nikon software. Lightroom just blows it out of the water.
I honestly hope that Nikon eventually releases some imaging software that's capable of a decent workflow, but at the moment, that isn't the case. Add to that the fact that Lightroom just does so much more, and there is no question about the victor here.
Lightroom can catalogue, and since version 2, Lightroom does it VERY well. You need to let it ingest and build previews for new images (which is best done with you going to get a cup of coffee while LR does its thing), but once that stage is finished, Lightroom is FAST. I used to use PhotoMechanic for its speed in sorting and browsing RAW files, but not any more. Lightroom is just as fast, so there's no need.
The tweaks and edits you can perform to an image in Lightroom are almost unending. In fact, I rarely need to take an image into Photoshop now. Lightroom can do everything I need done, from vignettes to cloning out spots, from highlight recovery to curve adjustments.
Lightroom can also build very decent web galleries. It includes the popular Airtight Simpleviewer, Autoviewer, and Postcardviewer web gallery plug-ins. You can also find numerous other plug-ins on the web. My favourite is SlideShowPro.
The tweaks and customizing you can do to the look of Lightroom itself is cool too. You can edit the Lightroom Identity plate to show your studio logo instead of the Lightroom logo. This is fantastic for when you want to show a client some images. It just looks that much more professional.
Lightroom, like Photoshop, is incredibly powerful, and as such, requires some learning. Don't expect to just install it and know everything there is to know in ten minutes time. With great power, comes great responsibility... your responsibility to take some time to learn how to harness that power. I have to laugh when I hear people complain that Lightroom is too complicated, only to find out they've never given it more than a couple of minutes to learn it. Yes, it takes some time to get the full benefit from Lightroom, but trust me... its worth it!
As you can tell, I'm a big fan of Lightroom. Version 2 has brought HUGE improvements in almost every aspect, especially speed. One caveat I will note is that Lightroom is really designed to run on a more powerful computer. My dual core laptop with 4GB of RAM runs it OK, but not anywhere near as well as my Quad Core desktop with 6GB of RAM. I have friends with even faster systems that say they don't even see LR working, it's just that fast. So, you probably don't want to be running Lightroom on an older computer, especially if you're working on a lot of images on a regular basis.
If you have an image where you just can't seem to quite get the color or "look" that you want, try running it through Nikon ViewNX or CaptureNX. You may find that'll give you your fix. For the other 99.9% of the time though, Lightroom is the software to go to. It's fast, powerful, and intuitive. Best of all, if you take the time to learn it, you can refine your workflow to a level you didn't think possible.
Check out my other Lightroom Tutorials.
If you don't have Adobe Photoshop Lightroom 2
Subscribe to:
Comments (Atom)