Thanks for visiting the Art of the Image blog. We've moved over to www.artoftheimage.com so this blog is no longer updated, but please feel free to peruse the articles and content here.

When you're finished, please visit us at www.artoftheimage.com for all the current blog posts and information. Thanks!!!
Showing posts with label jpg. Show all posts

Friday, August 14, 2009

Is JPG Making A Comeback?


Periodically, I hear of another photographer who shoots JPG, and sometimes it makes me pause to consider the old JPG vs RAW debate.

1001 Noisy Cameras, a great photography website to keep up to date with all the latest comings and goings in the photography world, made the comment that "there seems to be a renewed JPG-shooters movement". They note "the very popular Pioneer Woman Photography blog" as an example.

I started thinking about who else I knew of that shoots JPG. Ken Rockwell came to mind. Ken's an avid JPG shooter, when he's not shooting film, or the Real RAW as Ken calls it. Ken explains why he shoots JPG in his article JPG vs RAW. The subtitle, "Get It Right The First Time" kinda gives you an idea of where the article is going, and what Ken's feeling are on JPG.

If memory serves, the Bebbs, "one of the top 10 wedding photographers on the planet" shoot JPG with their Canon 5D MarkII DSLRs, which actually brings up another point.

Does the DSLR you're shooting with factor into whether you shoot JPG or not? Obviously the newer DSLR cameras are most likely to render the best quality JPG files, so this might be a factor in whether a photographer is shooting JPG or RAW.

Jeff Ascough is another world renowned wedding photographer (one of my personal favourites) that shot JPG for the longest time, although I seem to recall hearing that he's switched to RAW in the last couple years.

These are the only JPG shooters that come to mind off the top of my head. I'm sure there are many others out there. Feel free to leave a comment and let us know if you're one of them!

Now RAW shooters, or those that shoot RAW + JPG, I can think of loads of them! Since we're on wedding photographers, Neil van Neikerk of Planet Neil shoots RAW, not JPG.

Roel of Roel Photo doesn't shoot JPG, he shoots RAW.

Ray Prevost of Prevost Photo shoots RAW, not JPG.

Bruce Dorn, a Canon Explorer of Light, doesn't shoot JPG. Bruce shoots RAW.

Cliff Mautner, a great Nikon shooter, shoots RAW, not JPG.

I think the great Denis Reggie shoots RAW too, not JPG.

Most landscape photographers don't shoot JPG. They shoot RAW. Micheal Reichmann of Luminous Landscape shoots RAW. He also has a great article on Understanding RAW Files.

Prolific Nikon writer and shooter Thom Hogan doesn't shoot JPG. Thom shoots RAW.

The incredible IR and UV photographer Bjorn Rorslett shoots RAW, not JPG.

Most commercial photographers don't shoot JPG, they shoot RAW.

Joe McNally, one of my absolute favorite photographers in the world, shoots RAW, not JPG.

Dave Black, another great Nikon photographer, doesn't shoot JPG. Dave shoots RAW.

Ok, you get the point. Most of the biggest names in photography today are shooting RAW, not JPG, and there's a really good reason for that. JPG cuts your options down. JPG doesn't give you the processing latitude that RAW does. JPG is a lossy compression standard, meaning that you'll lose some quality when the JPG algorithm compresses you're image into a JPG from your camera's native RAW. JPG quality gets worse the higher the compression you use.

JPG also doesn't give the exposure correction latitude that RAW does. With Adobe's Lightroom, you can boost your exposure around 2 stops without negative effects, and while you can do this with JPG files, the quality isn't as good.

JPG files don't allow you to recover blown highlights and correct for overexposure. RAW files give you quite a bit of latitude to do this, especially with Lightroom. Sure, you can espouse the "get it right the first time" theory, but everyone makes a mistake sometime. Or maybe it's not a mistake. Maybe you just realize after the fact that you like the way an image looks with a stop or 2 of exposure adjustment. You're FAR better off with a RAW file than a JPG file in this case.

And what about white balance? All of us have had those images where the lighting was a mix of tungsten, ambient, flourescent, incandescent, candle light, car headlights, other camera's flashes, DJ strobes... well you get the point. :-) JPG doesn't do white balance correction nearly as well as RAW. Sure you can correct a JPG file's white balance, and it's fairly easy to do now that Lightroom handles JPG files, but your result will be nowhere near as good as it would have been from a RAW file.

You can test these things for yourself. Set your DSLR to RAW + JPG and take some photos. Make sure to take some in mixed lighting if you can find it. Set your DSLR manual and intentionally overexpose some photos. Now intentionally underexpose some. Back at your computer, start pushing them in Lightroom or whatever photo program you use. Push them to varying extremes, save them, and compare them side by side. You'll see the difference.

I'm not saying you can't take a great photo using JPG. I periodically do it myself, as I noted in the Joy of JPG where you can see some great shots (check out the White Tiger) shot in jpg taken straight out of camera. Note though, that while these are all OOC JPG photos, I shot in RAW + JPG so I had both the RAW files and JPG files in case I needed to go to the RAW file for some post processing. Best of both worlds!

What I am saying is that you're really cutting down your processing options by shooting in JPG. JPG doesn't give you the power in post that RAW does. JPG also doesn't give you that nice insurance policy in case you overexpose or get your white balance way off. RAW does. Check out my article Lightroom vs Nikon Capture / Nikon View for more on why RAW is so great! If you shoot Canon, check out my article on Canon DPP- Digital Photo Professional for RAW & JPG and my Canon DPP Workflow.

Ultimately, it's your decision, but I shoot RAW and most other PRO photographers do too!

Do you shoot JPG or RAW? Why? Leave a comment and let us know!
Tuesday, July 7, 2009

Lightroom vs Canon DPP

Since I posted my Lightroom vs Nikon Capture / Nikon View article, I've had quite a few inquiries about my thoughts on Lightroom vs Canon's DPP (Digital Photo Professional) software.

I always liked DPP when I worked with it. It was very easy to work with (once you got the workflow figured out) and capable of delivering excellent quality RAW develops from Canon CR2 files. (for those that missed it, here's the link to my previous article on using Canon DPP.)

So I got to thinking that an actual comparison between Lightroom and DPP was in order.

Overall, my thoughts on comparing the RAW develops from each are very similar to the Lightroom vs Nikon comparison I did. In general, DPP does a better job right out of the gate with no tinkering.

You can get the same results, or very close, from Lightroom, but DPP provides a beautiful result right out of the camera as it were.

Between DPP and Lightroom, sometimes I liked the DPP file slightly better, and sometimes I liked the Lightroom file a little better. I used the Camera Standard profile in Lightroom, so the results were always pretty close (once I turned off my own presets).

That's the big thing that's changed since I used DPP a lot. Lightroom introduced camera profiles, and they do an excellent job of giving you the same or similar results as you would have got with a straight out of camera jpg or with the Canon software.

My conclusion here would be that DPP is great for quick and easy RAW to jpg conversions without having to tinker. Lightroom can take some tinkering to get an equally good result, but it's much better now that we have the camera profiles available.

Lightroom can match or come VERY close to Canon's DPP in quality when it comes to developing RAW CR2 Canon files. When it comes to workflow, speed, and versatility, Lightroom just blows Canon DPP away, although not as bad as it does Nikon. DPP is much more usable than the Nikon software.

Let's look at a couple images to see the results.

These are all from RAW files, developed as is with no adjustments (except a small exposure correction in a couple of them).

Lightroom 2 develops were set to Camera Standard as that was my default camera setting with my Canon DSLR's. DPP already defaults to the camera setting and does not need to be set in the software.

All the images have been saved at 800 pixels on the long side. The images aren't posted for pixel-peeping, only to show the basic differences between the Lightroom and DPP RAW develops. Please don't email with complaints about pure testing methods and such... that's not why I posted these.


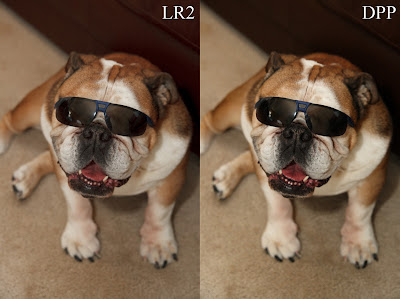
Here's my bulldog Hyla, posing for the camera (Canon 30D) with a pair of sunglasses on. In this instance, DPP rendered the contrast and tones a little punchier than Lightroom did.

I actually like the DPP shot better, but I can get the same thing out of Lightroom very easily. For a quick and easy develop with no tinkering, I have to say DPP beat Lightroom here.


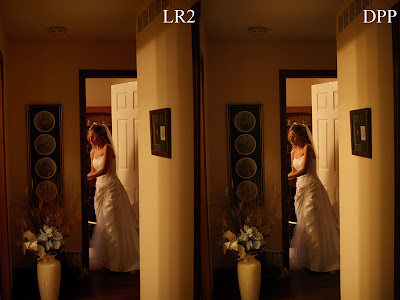
Here's a shot of a bride from a wedding I shot with a Canon 20D. Both are very similar, but I have to give the edge to the DPP develop.

Again, I could've got the same look in Lightroom very quickly, but DPP rendered this beautifully with no tinkering.


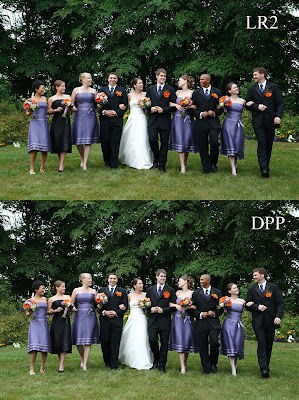
This bridal party shot (Canon Rebel XTi) is so close I almost wouldn't call a winner.

On close inspection in Photoshop, I'm going to give a slight nod to DPP, but it's so close it's probably more appropriate to call it a draw. Lightroom does an excellent job here.


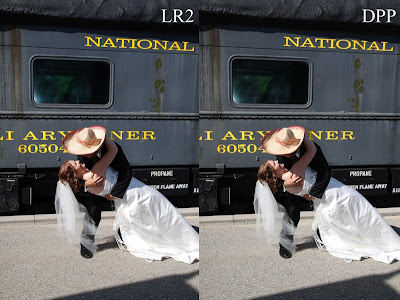
This shot (Canon Rebel XTi) of a bride and groom with a train in the background is a tie. I can't even tell the difference in Photoshop without really studying it. Even then, neither is better than the other. Lightroom matches DPP quality here.


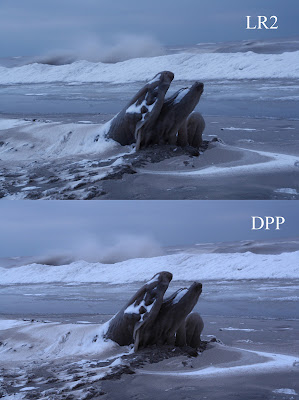
This photo of the Lake Erie shoreline in winter (Canon 30D) is, again, very close. I actually think Lightroom won this one by a slight margin, because I prefer the detail rendering Lightroom did, especially in the log on the shore.

Again though, they're so close it's hard to call a winner. Lightroom does a great job with color and kudos for the better detail rendering.

It's worth noting that DPP doesn't demand as much from your computer as Lightroom does. Lightroom likes as much power as you can give it, while DPP runs quite comfortably on a less than top of the line machine.

DPP is a valid alternative to Lightroom if you don't want to spend the money on Lightroom. Workflow isn't as good or as fast as Lightroom's, but it's still very usable. I used to use DPP as my primary RAW conversion software for a year or more.

If you're a Lightroom convert like myself, consider using DPP when you're having trouble getting an image just right in Lightroom. You may be surprised how good it looks in DPP without having to make any adjustments at all.

Feel free to post a comment and let me know your experiences with DPP.

If you don't have Adobe Photoshop Lightroom 2, Amazon usually has the best price.


See you behind the camera!

Matt

Canon DPP Workflow & FREE E-book

How to Thrive as an Artist Without Selling Out:
The Unconventional Guide to Art and Money

Saturday, May 23, 2009

Lightroom versus Nikon Capture / Nikon View


Let me start off by saying, I love Adobe Photoshop Lightroom 2. Over the years, I've tried pretty much every RAW processor out there, but Lightroom takes the cake. Lightroom makes a RAW workflow easier and more efficient than jpg. There is simply no faster way to get the most from your image files, and since Lightroom added camera profiles, I find I can match out of camera color pretty much exactly.


I say pretty much because occasionally I like the color of an out-of-camera (OOC) jpg better than the Lightroom version of the same image from RAW. This doesn't occur very often, so it's not a big deal. I just mentioned it because if I'm having a hard time with the RAW file, sometimes a quick conversion using Nikon ViewNX is the easiest solution.

Of course, if you are able to shoot perfectly so that you never need to touch an image in post-editing, then a jpg workflow is obviously the best for you. I say this tongue in cheek, because while I enjoy shooting RAW+jpg so that I have the jpg ready to use right way, there isn't very often that I don't want to work on an image in post, especially if I'm shooting for work (i.e. a wedding, a portrait shoot, commercial work, etc.).

I still see it said fairly frequently that the easiest solution to a fast efficient workflow is to shoot it right in camera and not have to work on it in post. While this is great in theory, it doesn't hold up in reality. Most of the time when I see someone espousing this type of thinking, I look at the images they're using as examples, and I immediately see how I would've worked on them in post. Maybe I'm just picky, but I want my work to look the best it can, and that usually means I want to work on it in post. It's not that an image doesn't look good straight out of camera, it's that it can look better.

Think of it in film terms from the "old" days. You'd have a negative or slide of a great shot, which, in the hands of a GREAT printer, makes a beautiful print (when I say printer, I'm talking about a artisan who has mastered the art of making a print... not a piece of hardware). The negative or slide was great, and the finished print is a masterpiece.

Same thing with jpg versus RAW. The jpg is like a print, where the RAW file is like the negative or slide. The jpg can be great, but what you see is pretty much what you get. There isn't a lot of latitude to work on it. A RAW file has MUCH more latitude for working it, and the therefore the print has more potential.

And that's where Lightroom shines. The power of RAW developing that Lightroom offers is hard to beat. You can even work on jpgs in Lightroom, although I've found that when I compare them head to head, the RAW file looks better about 99% of the time after editing in Lightroom. Jpg files just don't stand up as well when it comes to editing as RAW files dodoes.

But the title of this post is "Lightroom versus Nikon Capture or Nikon View", isn't it. :)


Well, periodically I open up Nikon CaptureNX or Nikon ViewNX and run a few conversions just to compare the results against Lightroom. Most of the time, it's a draw. Lightroom color is now pretty much the same as CaptureNX or ViewNX now that Lightroom has camera profiles. Once in a while though, I find an image that I just like better OOC or processed through Nikon software. Usually the color just looks a bit better, or the contrast or saturation just looks better.

What is interesting though, is that more often than not, the thing I do notice is the images out of Nikon ViewNX (I usually use ViewNX as it's faster and easier to do a quick RAW develop in ViewNX than it is in CaptureNX), have better fine detail. The Nikon software (whether in camera, or using Capture or View) just seems to have a slight edge in how it renders an image. This isn't surprising really when you think that Nikon should be able to get the most out of their image files... after all, they wrote the coding for them.

I'm not talking earth-shattering differences here. Most of the time it's subtle. Sometimes, it's more noticeable, but it's still not a drastic difference. Most of all, it's never enough of a difference that I would suffer the Nikon software workflow instead of using Lightroom.

That is the biggest difference between Lightroom and Nikon CaptureNX or Nikon ViewNX. The Nikon software is absolutely intolerable from a workflow standpoint. It's slow and sluggish, and whoever designed it obviously has never had to sit down and edit a thousand or more images from a wedding. Even working on a smaller shoot of a hundred or two images is painful with the Nikon software. Lightroom just blows it out of the water.

I honestly hope that Nikon eventually releases some imaging software that's capable of a decent workflow, but at the moment, that isn't the case. Add to that the fact that Lightroom just does so much more, and there is no question about the victor here.

Lightroom can catalogue, and since version 2, Lightroom does it VERY well. You need to let it ingest and build previews for new images (which is best done with you going to get a cup of coffee while LR does its thing), but once that stage is finished, Lightroom is FAST. I used to use PhotoMechanic for its speed in sorting and browsing RAW files, but not any more. Lightroom is just as fast, so there's no need.

The tweaks and edits you can perform to an image in Lightroom are almost unending. In fact, I rarely need to take an image into Photoshop now. Lightroom can do everything I need done, from vignettes to cloning out spots, from highlight recovery to curve adjustments.

Lightroom can also build very decent web galleries. It includes the popular Airtight Simpleviewer, Autoviewer, and Postcardviewer web gallery plug-ins. You can also find numerous other plug-ins on the web. My favourite is SlideShowPro.

The tweaks and customizing you can do to the look of Lightroom itself is cool too. You can edit the Lightroom Identity plate to show your studio logo instead of the Lightroom logo. This is fantastic for when you want to show a client some images. It just looks that much more professional.

Lightroom, like Photoshop, is incredibly powerful, and as such, requires some learning. Don't expect to just install it and know everything there is to know in ten minutes time. With great power, comes great responsibility... your responsibility to take some time to learn how to harness that power. I have to laugh when I hear people complain that Lightroom is too complicated, only to find out they've never given it more than a couple of minutes to learn it. Yes, it takes some time to get the full benefit from Lightroom, but trust me... its worth it!

As you can tell, I'm a big fan of Lightroom. Version 2 has brought HUGE improvements in almost every aspect, especially speed. One caveat I will note is that Lightroom is really designed to run on a more powerful computer. My dual core laptop with 4GB of RAM runs it OK, but not anywhere near as well as my Quad Core desktop with 6GB of RAM. I have friends with even faster systems that say they don't even see LR working, it's just that fast. So, you probably don't want to be running Lightroom on an older computer, especially if you're working on a lot of images on a regular basis.

If you have an image where you just can't seem to quite get the color or "look" that you want, try running it through Nikon ViewNX or CaptureNX. You may find that'll give you your fix. For the other 99.9% of the time though, Lightroom is the software to go to. It's fast, powerful, and intuitive. Best of all, if you take the time to learn it, you can refine your workflow to a level you didn't think possible.

Check out my other Lightroom Tutorials.

If you don't have Adobe Photoshop Lightroom 2, Amazon usually has the best price.

Sunday, May 3, 2009

The Joy of Jpg... Using Images Straight OOC


Let me start by clarifying that I'm a RAW shooter, or as of late, RAW+jpg.

We all know the beauty of RAW, and that no sane person would shoot jpg, but lately I've been finding myself enjoying jpg. Of course, using the RAW+jpg setting on my Nikon D300's, I've still got the RAW files too, so I know they're there if I need 'em. Kinda' like a digital security blanket. :)

But a lot of the time I don't need the RAW files, as the image looks just fine in jpg. In fact, sometimes it's extra work just to get a RAW file developed out of Lightroom to look the way the OOC jpg does (for those of you that don't know, "OOC" means Out of Camera, as in straight out of camera with no modifications or Photoshopping).


Ever look at a RAW image file and find you just can't get it to look quite like it did when you saw it on the camera's LCD? Maybe you've shot RAW+jpg, and the jpg just seems to look better than your jpg you developed from RAW, no matter what adjustments you make?

More and more lately, I'm finding I just go to the OOC jpgs. If you've shot the image well, you likely don't need to adjust it much, if any, and jpgs stand up very well to minor editing like contrast boosts, a color action or two, and a little sharpening. This is especially true of jpgs from the current crop of modern DSLR's.


Jpgs out of DSLR's like the Nikon D300, D90, D700, and D3, contain an incredible amount of data and hold up very well to post-processing. In fact, this is pretty much true of any of the newer DSLR's. The jpg engines in these cameras are doing a fantastic job at processing images.

Granted, there are still a couple of areas where RAW files hold an incredible advantage over jpgs. When it comes to highlight recovery, you just can't beat RAW. Jpg offers little if any highlight recovery room, but RAW offers up to 2 stops of highlight recovery with modern software such as Lightroom 2.3. If you've shot RAW+jpg, you can go to the RAW file for those images where you find you need to pull back the exposure a bit.


The other area where RAW files still have a BIG advantage over jpgs is white balance. If your white balance isn't right OOC, then it's easier and often faster to fix it using the RAW file than it is using a jpg. You may not even be able to fix a jpg file properly, whereas you can almost always fix a RAW file's white balance to your satisfaction.


RAW+jpg offers you the best of both worlds. You've got your jpgs, straight out of camera and ready to go, and you've got your RAW files in case you want to do some serious editing.

Another BIG advantage of RAW+jpg is the speed difference that your computer can view and process the files. This is especially true for those of us that do a lot of work on laptops, which are usually not as powerful as our tricked out desktop machines.


My laptop for example, is a brand new Dell Inspiron 15 with a Core 2 Duo T6400 2.0 Ghz processor and 4 GB of RAM. While still being a very fast machine for a laptop, it is nowhere near as fast as my desktop, an Intel Quad Core with 6GB of RAM. When it comes to working with RAW files, my desktop blows my laptop out of the water. Don't get me wrong, the laptop can handle them... I just have to wait a bit, which I'm not used to doing as I'm spoiled with the speed of my Quad Core desktop.


Here's the thing though... if I just load up the jpgs into my laptop, everything from ingesting to viewing to processing goes much faster, and most of the time, the jpgs are all I need. I can quickly make my selections and any edits without the speed penalty that comes with the RAW files, but I also know I have the RAW files there should I need to go to them.

All the image above are OOC jpgs from my D300, re-sized to 800 pixels using Picasa 3. I specifically used Picasa instead of Lightroom for these, as Picasa is faster and easier to quickly view a folder of jpgs, make a few selections, and re-size for the web (especially on my laptop).

While I might normally tweak a little contrast, fill light, and a few other things in Lightroom, these images are all straight OOC to illustrate the point I've been making. There is a joy in looking through images without having to spend a lot of time working on them. Jpg facilitates this.


Sometimes we get a little too caught up in the craft of making images, and the joy of taking pictures gets lost. Having the jpgs and being able to use them when the RAW isn't needed is liberating.

Next time you pick up your camera, try setting it to RAW+jpg. You might be surprised at how nice it is to re-experience "The Joy of Jpg... Using Images Straight OOC!"

P.S. All of the images above were shot yesterday at the Brantford Twin Valley Zoo, in Brantford, Ontario. It's a fantastic little zoo, and a great place to take the kids. We lucked out on our visit yesterday, as there were newborn goats (in fact, some were being born while we were there) and a newborn Black Bear cub!

Monday, August 27, 2007

Canon DPP - Digital Photo Professional for RAW & JPG

I'm sure a lot of folks haven't even tried, or considered trying, Canon's DPP (Digital Photo Professional) software that comes bundled with Canon DSLR's. I know I didn't until a photographer friend I respect a lot told me that's what he is using to process most of his Canon CR2 RAW files.

So I decided to check it out, and I quickly decided it wasn't for me. Like most things in life, change isn't usually welcome. We get set in our ways and used to the way we do things. DPP seemed slow, and the interface didn't appeal to me.

Almost a year later, another conversation with my same friend had me deciding to try DPP again. This time I decided to give it a more thorough testing, and actually process an entire wedding with it. My initial reaction was similar to the first time I tried it... I didn't care for it. BUT, I forced myself to experiment some more and give it a fair shot. Boy am I glad I did!

What I soon found was that DPP is the fastest way to get the best looking results from my Canon files. Whether from my 20D, 30D, 40D, or XTi, DPP wins every time for image quality. I tested it again and again against other RAW processors including ACR, Bibble, and Capture One. DPP kept producing the best image files with the best color.

Skin tones are awesome with DPP... better than anything I've been able to get using any other RAW converter. And the workflow is actually very fast once you get your head wrapped around it. Now that I've gotten used to using DPP and developed my own workflow with it, I can fly through a wedding of 1,000 to 2,000 images faster with DPP than I could with ACR, Lightroom, Bibble, or Capture One.

AND I GET THE BEST COLORS, SKIN TONES, AND FILE QUALITY!

This is the biggie folks. DPP is giving me the best quality images I've yet to see from Canon files, and once I forced myself to give it a fair chance, my workflow is faster than ever using DPP.

Another plus using DPP is that you can get the same look from a CR2 RAW file as you would've got shooting in-camera jpgs. How many times have you fiddled and fiddled with a RAW image trying to get it to look like it would've had it been an in-camera jpg? I know I have many, many times. Not now.

DPP recognizes your in-camera settings when it loads the CR2 RAW files and will give you the same jpg as you would've got shooting jpg with your camera. This alone is awesome! No need to shoot RAW + Jpg anymore! Just shoot RAW and let DPP do your conversions, without any adjustment if you want it to look as you shot it in-camera, or with adjustments if you want to make corrections.

The other BIG thing I've just recently noticed with DPP, is that it gives you a degree of highlight recovery for jpgs, not just RAW CR2 files. As you know, jpgs hold up pretty well to basic adjustment and exposure increases, BUT they don't offer any degree of high-light recovery. That's a big reason why most of us professional photographers shoot RAW. We're not always perfect, and it's nice to have some high-light recovery latitude if you've made a boo-boo.

Until now that is... DPP will give you some high-light recovery with jpgs. From my experiences, it's not nearly as significant as the degree of high-light recovery you'll get from a CR2 RAW file, but it does give you some, which is better than none.

Try it for yourself. Shoot some jpg images with varying degrees of over-exposure. Open them up in DPP and see how much high-light recovery you can get. I think you'll be pleasantly surprised.

While I'm on the subject of high-light recovery, I should mention that it is the one area where DPP does not beat the rest. Adobe's Lightroom, from my observations, is currently the best at high-light recovery from RAW files. DPP is good, just not as good as Lightroom. I'd say DPP will give you a full stop to 1 1/2 stops of highlight recovery, depending on the image, whereas Lightroom will usually give you 1 1/2 to 2 stops, depending on the image.

So, if you aren't using DPP, give it a try. If you've tried it before, and decided against it as I had, try it again. Give it a good chance. You may just change your RAW workflow for the better. :-)

Best of all... it's free!

(Update: Read my latest article on Lightroom vs Canon DPP here.)