Thanks for visiting the Art of the Image blog. We've moved over to www.artoftheimage.com so this blog is no longer updated, but please feel free to peruse the articles and content here.
When you're finished, please visit us at www.artoftheimage.com for all the current blog posts and information. Thanks!!!
Saturday, May 30, 2009
Read Your Camera Manual
A lot of people never really take the time to really get to know their cameras.
Your camera manual can be very enlightening, especially if you've never opened it.
Take a few minutes to browse through it. You never know... you just might learn something you didn't know.
Photographer's 5 Minute Workout
Professional photographers can have some pretty grueling days, and wedding photographers have some of the longest days of any photographer. Early morning starts that run the whole day into the reception in the evening can have us working 12, 13, and 14 hour days, and even longer with few if any breaks. Trekking around heavy camera bags, additional lighting equipment, and hanging heavy cameras and lenses combos off of our necks and shoulders takes its toll. Obviously this is harder to do if you're not in good shape.
I'm as guilty as the next photog of not sticking to an exercise program. Ten years back, I used to hit the gym at least 4 days a week and often 7. I fed off of working out. I was a workout fanatic and nothing felt better than getting pumped at the gym. These days, I don't even know what the inside of my closest gym looks like.
My saving grace is a new look on what I need to do to stay in shape. Going to the gym is great, but it isn't neccessary. You can do everything you need to do to stay in shape, right in your own home, with no equipment at all.
Don't believe me?
The "old marine workout" followed this kind of idea. It consisted of a lot of push-ups, sit-ups (although now a days we do crunches), chin-ups, stretches, jumping jacks, and running. No equipment needed, and who isn't in better shape than a marine?
I've taken the "old marine workout" and refined it for me. I needed a workout that was quick, easy to do, easy to do pretty much anywhere, and one that worked. Actually, I think a lot of people would like this type of workout, not just us photographers.
Here's my Photographer's 5 Minute Daily Workout:
Set of Squats *
Set of Push-ups ****
Set of Crunches
Set of Arm Curls (or Chin-ups) **
Set of Wrist Curls ***
Set of Leg Raises
Repeat All
You should be able to get through all the sets at least twice in 5 minutes. Don't fret if you can't at first, just do what you can and extend the workout by a minute or two if you need to.
As you get progress, try and get through all the sets three times. Once you can do all the sets three times, increase the number of reps in each set by 50%. You'll likely be back to just doing all the sets twice.
I recommend starting with sets of 10, but if this is too much for you, reduce it to what you can do. As you progress, slowly increase the number of reps. If 10 reps is too easy to start with, go higher.
If you want faster results, do the routine twice a day. Even faster, do it 3 times a day.
* We're doing squats with only your body weight. Stand with legs shoulder width apart, feet angled slightly out, and staying stationary, bend your legs (squat) until your thighs are parallel to the floor.
** Arm curls are done with no weight. Pretend your holding a curling bar, and contract your arm muscles as you curl as if you're lifting a heavy weight. Careful though, you can actually strain too much doing this. Chin-ups are an even better option if you have a chin-up bar available. If you don't consider adding one. I like the removable doorway ones like this one.
*** Wrist curls are done with no weight. Holding your arms out at your sides, make a fist and curl your wrist up like your flexing your forearm.
**** For push-ups, you can add a set of push-up bars like these.
Shake it up if you'd like. Add a new exercise like jumping jacks. Throw in a half hour walk on top. Increase it to 10 Minutes. Go crazy and do 15.
But start today! You'll feel better. Your gear won't feel so heavy. Your back won't hurt so much when you get home, and your knees won't ache so much the next day.
That's it! Now you have no excuse (and neither do I since I've gone public :).
Wednesday, May 27, 2009
Blue Sky Barn
Blue Sky Barn by Matt Ballard
The third print in the Sault Ste. Marie series. The play of the sun across the field leading up to the barn on the hill was beautiful. The tree to the right was an added bonus. .
Print type: archival pigment print
8"x12" - $35 - Limited Edition of 350
12"x18" - $350 - Limited Edition of 35
Available for purchase at 350art.org... Saving the Planet One Work of Art at a Time!
35% Of All Sales Go To 350.org
Labels:
350.org,
350art.org,
Blue Sky Barn,
Limited Edition Prints
Tuesday, May 26, 2009
Doing the Impossible
“The person who says something is impossible should not interrupt the person who is doing it.” - an old Chinese proverb
I love it! I may have to frame this on my wall.
I read it in Chris Guillebeau's 279 Days to Overnight Success, which is a fantastic read for anyone who does business online or who is considering it. Kudos to Chris for making it FREE!
http://chrisguillebeau.com/3x5/
I love it! I may have to frame this on my wall.
I read it in Chris Guillebeau's 279 Days to Overnight Success, which is a fantastic read for anyone who does business online or who is considering it. Kudos to Chris for making it FREE!
http://chrisguillebeau.com/3x5/
Sunday, May 24, 2009
Uncle Bob Knew Good Lighting was Critical
Good lighting is critical.
There's nothing wrong with using flash, but how you use it is everything.
On camera flash, pointed straight at your subject, SUCKS.
(**EXCEPTION** On camera flash dialed down to -2 or lower and used outside for fill is ok, off camera is better)
Off camera flash can look great.
More is most often not better.
Less is most often best.
Subtle is wonderful.
Hard light can be nice.
(if you have no idea what I'm talking about, read this.)
Saturday, May 23, 2009
Lightroom vs NikonViewNX Sample Images
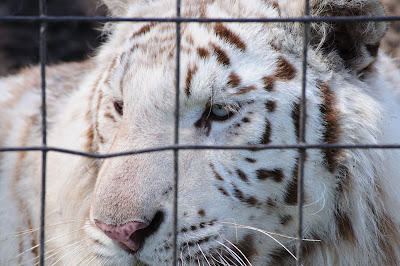
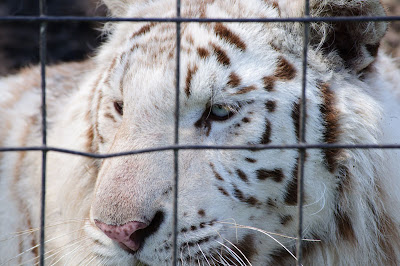
Here's some sample images developed in Nikon's ViewNX and Adobe's Lightroom 2.
They are all from RAW files, developed as is with no adjustments (except a small exposure correction in the first image). The first pair of images and last pair of images have been cropped in Photoshop for esthetic presentation. The white tiger pair of images are the original frames, no crop.
Lightroom 2 develops were set to Camera Vivid as that is my default camera setting. ViewNX reads this automatically as the camera setting and does not need to be set in the software.
All the images have been saved at 800 pixels wide and compressed for web in Photoshop (save for web - high). The images are not intended for pixel-peeping of ultimate quality, but rather to show the differences between the two RAW developing softwares. Please don't email with complaints about pure testing methods and such... that's not why I posted these.
Lastly, I've used Nikon ViewNX and not CaptureNX, simply because it was easier. The results should be the same from a straight ooc conversion.
Nikon ViewNX
Lightroom 2
This first pair of images is not the usual result I see when I do these Lightroom vs ViewNX comparisons. I actually like the color and overall look of the Lightroom jpg better. Detail rendering is similar, but there are visual differences even with these jpgs compressed for web. The Nikon jpg has better detail in the hair and sides of the head.
Nikon ViewNX
Lightroom 2
The white tiger images show what I usually see between Nikon and Lightroom RAW develops. I prefer the color and overall look of the Nikon jpg. Again, they're both very close, but the ViewNX jpg just looks a little bit better. The ViewNX jpg also has more detail visible, especially around the eye and the bridge of the nose.
Nikon ViewNX
Lightroom 2
Like the white tiger, this pair of images show again what I usually see in Nikon versus Lightroom RAW develop comparisons. The Nikon jpg gets the nod. Detail, color and overall look is better in the ViewNX jpg.
Again, the differences are not huge, but they are there. You can see them clearly even in these web-size jpgs. The differences are even more visible in the full-size jpgs. Granted, color and overall look are subjective determinations, but detail is not. Could I tweak the detail in Lightroom using sharpening and clarity? Probably. I could probably get it close, but I doubt I could match it exactly. Remember, these are straight out of ViewNX with no adjustments. I didn't have to spend time tweaking.
Food for thought.
Lightroom versus Nikon Capture / Nikon View
Let me start off by saying, I love Adobe Photoshop Lightroom 2. Over the years, I've tried pretty much every RAW processor out there, but Lightroom takes the cake. Lightroom makes a RAW workflow easier and more efficient than jpg. There is simply no faster way to get the most from your image files, and since Lightroom added camera profiles, I find I can match out of camera color pretty much exactly.
I say pretty much because occasionally I like the color of an out-of-camera (OOC) jpg better than the Lightroom version of the same image from RAW. This doesn't occur very often, so it's not a big deal. I just mentioned it because if I'm having a hard time with the RAW file, sometimes a quick conversion using Nikon ViewNX is the easiest solution.
Of course, if you are able to shoot perfectly so that you never need to touch an image in post-editing, then a jpg workflow is obviously the best for you. I say this tongue in cheek, because while I enjoy shooting RAW+jpg so that I have the jpg ready to use right way, there isn't very often that I don't want to work on an image in post, especially if I'm shooting for work (i.e. a wedding, a portrait shoot, commercial work, etc.).
I still see it said fairly frequently that the easiest solution to a fast efficient workflow is to shoot it right in camera and not have to work on it in post. While this is great in theory, it doesn't hold up in reality. Most of the time when I see someone espousing this type of thinking, I look at the images they're using as examples, and I immediately see how I would've worked on them in post. Maybe I'm just picky, but I want my work to look the best it can, and that usually means I want to work on it in post. It's not that an image doesn't look good straight out of camera, it's that it can look better.
Think of it in film terms from the "old" days. You'd have a negative or slide of a great shot, which, in the hands of a GREAT printer, makes a beautiful print (when I say printer, I'm talking about a artisan who has mastered the art of making a print... not a piece of hardware). The negative or slide was great, and the finished print is a masterpiece.
Same thing with jpg versus RAW. The jpg is like a print, where the RAW file is like the negative or slide. The jpg can be great, but what you see is pretty much what you get. There isn't a lot of latitude to work on it. A RAW file has MUCH more latitude for working it, and the therefore the print has more potential.
And that's where Lightroom shines. The power of RAW developing that Lightroom offers is hard to beat. You can even work on jpgs in Lightroom, although I've found that when I compare them head to head, the RAW file looks better about 99% of the time after editing in Lightroom. Jpg files just don't stand up as well when it comes to editing as RAW files dodoes.
But the title of this post is "Lightroom versus Nikon Capture or Nikon View", isn't it. :)
Well, periodically I open up Nikon CaptureNX or Nikon ViewNX and run a few conversions just to compare the results against Lightroom. Most of the time, it's a draw. Lightroom color is now pretty much the same as CaptureNX or ViewNX now that Lightroom has camera profiles. Once in a while though, I find an image that I just like better OOC or processed through Nikon software. Usually the color just looks a bit better, or the contrast or saturation just looks better.
What is interesting though, is that more often than not, the thing I do notice is the images out of Nikon ViewNX (I usually use ViewNX as it's faster and easier to do a quick RAW develop in ViewNX than it is in CaptureNX), have better fine detail. The Nikon software (whether in camera, or using Capture or View) just seems to have a slight edge in how it renders an image. This isn't surprising really when you think that Nikon should be able to get the most out of their image files... after all, they wrote the coding for them.
I'm not talking earth-shattering differences here. Most of the time it's subtle. Sometimes, it's more noticeable, but it's still not a drastic difference. Most of all, it's never enough of a difference that I would suffer the Nikon software workflow instead of using Lightroom.
That is the biggest difference between Lightroom and Nikon CaptureNX or Nikon ViewNX. The Nikon software is absolutely intolerable from a workflow standpoint. It's slow and sluggish, and whoever designed it obviously has never had to sit down and edit a thousand or more images from a wedding. Even working on a smaller shoot of a hundred or two images is painful with the Nikon software. Lightroom just blows it out of the water.
I honestly hope that Nikon eventually releases some imaging software that's capable of a decent workflow, but at the moment, that isn't the case. Add to that the fact that Lightroom just does so much more, and there is no question about the victor here.
Lightroom can catalogue, and since version 2, Lightroom does it VERY well. You need to let it ingest and build previews for new images (which is best done with you going to get a cup of coffee while LR does its thing), but once that stage is finished, Lightroom is FAST. I used to use PhotoMechanic for its speed in sorting and browsing RAW files, but not any more. Lightroom is just as fast, so there's no need.
The tweaks and edits you can perform to an image in Lightroom are almost unending. In fact, I rarely need to take an image into Photoshop now. Lightroom can do everything I need done, from vignettes to cloning out spots, from highlight recovery to curve adjustments.
Lightroom can also build very decent web galleries. It includes the popular Airtight Simpleviewer, Autoviewer, and Postcardviewer web gallery plug-ins. You can also find numerous other plug-ins on the web. My favourite is SlideShowPro.
The tweaks and customizing you can do to the look of Lightroom itself is cool too. You can edit the Lightroom Identity plate to show your studio logo instead of the Lightroom logo. This is fantastic for when you want to show a client some images. It just looks that much more professional.
Lightroom, like Photoshop, is incredibly powerful, and as such, requires some learning. Don't expect to just install it and know everything there is to know in ten minutes time. With great power, comes great responsibility... your responsibility to take some time to learn how to harness that power. I have to laugh when I hear people complain that Lightroom is too complicated, only to find out they've never given it more than a couple of minutes to learn it. Yes, it takes some time to get the full benefit from Lightroom, but trust me... its worth it!
As you can tell, I'm a big fan of Lightroom. Version 2 has brought HUGE improvements in almost every aspect, especially speed. One caveat I will note is that Lightroom is really designed to run on a more powerful computer. My dual core laptop with 4GB of RAM runs it OK, but not anywhere near as well as my Quad Core desktop with 6GB of RAM. I have friends with even faster systems that say they don't even see LR working, it's just that fast. So, you probably don't want to be running Lightroom on an older computer, especially if you're working on a lot of images on a regular basis.
If you have an image where you just can't seem to quite get the color or "look" that you want, try running it through Nikon ViewNX or CaptureNX. You may find that'll give you your fix. For the other 99.9% of the time though, Lightroom is the software to go to. It's fast, powerful, and intuitive. Best of all, if you take the time to learn it, you can refine your workflow to a level you didn't think possible.
Check out my other Lightroom Tutorials.
If you don't have Adobe Photoshop Lightroom 2, Amazon usually has the best price.
Labels:
jpg,
Lightroom,
Nikon CaptureNX,
Nikon ViewNX,
RAW
Thursday, May 21, 2009
Rockstar Demographic Lens Chart of Photographers
Labels:
Rockstar Photographers,
Uncle Bob
Wednesday, May 20, 2009
Uncle Bobs New Business Cards & The Importance of Professional Wedding Photography
A common term that professional wedding photographers know all too well is "Uncle Bob". When we hear about an "Uncle Bob" situation, we usually laugh, shake our heads, sigh, or a combination of all three. "Uncle Bob" in this context refers to someone at the wedding (or going to be at the wedding) taking photos who is not a professional. They are often a family member, often an actual Uncle, and are often taking photos for free or close to it.
The problem with "Uncle Bob" is that, while he or she probably takes very nice pictures of flowers in the garden, the family dog, and occasionally a good family photo, "Uncle Bob" is just not experienced at photographing weddings.
Weddings are a "live" event where just about anything can and will happen to throw a wrench into the schedule. A professional wedding photographer knows this and can adapt to situations that arise with a transparency and skill that can only come from experience, skill, and training. "Uncle Bob" just doesn't have anywhere near the experience, skill, and training of a professional wedding photographer.
A wedding... YOUR WEDDING, is a pretty important event. Some would say a VERY important event, perhaps one of the most important events in your life. When I see people recommending having a relative or friend photograph a couple's wedding, I cringe. Not only is this putting a HUGE amount of responsibility on a person who is unqualified to do the job (and likely also isn't even aware of just how unqualified they are until the day of the wedding), but it's setting up the bride and groom for some serious disappointment.
A wedding day isn't a repeatable event. Unlike a portrait session or a commercial shoot, where we can re-schedule if there is a problem or the shots don't turn out as the client wanted, you can't do this with your wedding. You could try, I guess, to get all those guests back on a given day, at the same location, with all the same attire, same decorations, etc... (you get my point), but I don't think you'd be very successful, nor would you want to.
When all is said and done, the only thing you really have left to remember your big day with is your wedding photos. You've put a lot of time and effort, not to mention expense, into such a big event, so don't you want to make sure your wedding photos will be beautiful memories of that wonderful day?
I feel bad when I hear stories of couples who were very disappointed with their wedding photos taken by "Uncle Bob". I have couples contact me hoping that I can "fix" their photos that "Uncle Bob" took, and I feel bad when I have to tell them that there is very little that can be done. Even when something can be done, the amount of time involved in "fixing" their "Uncle Bob" photos is going to make it a much more expensive process than if they had just hired a professional wedding photographer in the first place.
Take the time to look through the portfolios of professional wedding photographers. You'll quickly see the differences in style and vision, but more importantly, you'll see the difference in quality. Compare the images of some of the best professional wedding photographers with those shot by someones "Uncle Bob". The differences become VERY evident, VERY fast! You'll quickly develop a feeling for what you like and what appeals to you, and you'll be able to see why having "Uncle Bob" or a "bargain" photographer shoot your wedding is just not worth it... at any price.
Tuesday, May 19, 2009
Transformers USB Memory Stick
Transforming USB Flash Memory (2 GB) - Ravage
This is just too cool not to post! Come on... you know you want one!
Get 'em here.
Sunday, May 17, 2009
Why the New Sigma DP2 is Intriguing
Sigma DP2
"The camera as it was meant to be - now more than ever." Interesting tag line Sigma used. Interesting because maybe they've got something here.
The other tag line, "a full spec compact digital camera with all the power of DSLR," sums it up quite well. You get the power of a full size Foveon DX sensor instead of the mini sensors in all the other point and shoot compact digital cameras, combined with a fast f2.8 lens.
The sensor alone is worth talking about. It's approximately TWELVE TIMES the size of the sensors in other point and shoot compact digital cameras. Everything is going to be better about this sensor. It'll have cleaner imaging power, better high ISO noise characteristics, and more powerful megapixels.
I know that's an odd way to say it, "more powerful megapixels," but it helps to explain a concept that many people don't get. In a world where a lot of camera buyers only understand one thing (how many megapixels), the difference in quality of those megapixels needs to be emphasized. Not all megapixels are created equal, and while it's great that you may have a 12 megapixel compact digital camera, it's certainly not the same thing as having a 12 megapixel DSLR like my Nikon D300. There is simply no comparison.
Unfortunately, camera manufacturers have done a great job teaching consumers to ask "how many megapixels?" Fortunately, Sigma has realized that there are still a lot of photographers who understand why a camera like the DP2 that uses a MUCH bigger sensor is better.
When it comes to sensors, bigger is almost always better. Not bigger as in more megapixels, but bigger as in actual real estate... the physical size of the sensor.
A megapixel does not equal a megapixel. You can have two cameras with 12 megapixel sensors, but when one is 12X bigger, it's gonna eat the smaller one for breakfast. Size matters, and the size of each megapixel matters. Think of the bigger sensor as having more light gathering ability, and then think of the Sigma DP2 as having 12X more light gathering ability than other 14 megapixel compact digital cameras. The DP2 wins by a landslide (all else being equal of course).
This is the same reason a camera like the Nikon D3 or Nikon D700 has better imaging characterics than the Nikon D300. All 3 cameras have 12 megapixel sensors, but the larger FX size sensor in the Nikon D3 and Nikon D700 have better low-light ability than the DX size sensor in the Nikon D300.
Same thing with the Canon 5D and the Canon 40D and 50D. The 5D's larger full-frame sensor has better low-light ability than either the Canon 40D or Canon 50D, and the 5D is an older model in comparison.
Granted, the differences between the D3 / D700 and the D300 (and the Canon 5D vs the Canon 40D and 40D) are nowhere near as great as the differences between the DP2 and other compact digital cameras. The FX to DX (full frame to cropped) size difference isn't 12X, like the DP2 to other compacts, but you get the idea.
Back to the DP2, with its bigger sensor combined with a very nice 24mm f2.8 (41mm equivalent in 35mm terms), this has all the makings for a fantastic pocket camera. The focal length is a good choice. It's basically a "standard" field of view which will make for a very usable camera. The fact that it's f2.8 is even better. You're not limited to a slower lens, and you should be able to get fairly shallow depth of field considering the sensor size.
Remember, sensor size also effects depth of field. The smaller the sensor, the greater the depth of field. Thus, the smaller the sensor, the harder it is to get that nice shallow depth of field, regardless of how fast your lens is. A f2.8 lens on a regular compact digital camera is not going to get you shallow depth of field. But the DP2 with it's 12X bigger sensor and f2.8 lens will!
You get a lot of the advantages of a DSLR with the DP2. A lot of the advantages that allow for increased creative control, control that allows for being able to capture incredible images you wouldn't otherwise be able to get. Granted, you don't get all the advantages of a DSLR (obviously you don't have the ability to change lenses), but you do get the advantage of a much smaller camera.
After looking through the sample images the good folks over at DPREVIEW have provided, I'm impressed by what I see. Sigma's Foveon sensors have always been capable of incredible imaging, and it looks like the DP2 is no exception.
Sigma has some sample images over on there website too.
I'll be interested to try out the DP2 for myself. I can see the DP2 being the pocket camera I (and a lot of other photographers) have been waiting for. It may end up coming home with me. :)
Saturday, May 16, 2009
The Magic of the Nikon 35mm f2.0 AF D
Nikon 35mm f2.0 AF D
This little gem has fast become my favourite lens. If I had to pick one lens, and only one lens, this would be it. It's tough because I love my Nikon 28-70mm f2.8 AF-S, but it's not as fast, and not as light, and while the 28-70mm f2.8 is FANTASTIC, it doesn't have the character and charm of the little 35mm f2.0. You'd be surprised too how much faster 2.0 is than 2.8. It doesn't seem like much, but it often looks huge... and it's the "look" that matters.
My Nikon 50mm f1.8 is feeling neglected. It's a little sweet-heart too. At about $100, you just can't go wrong with the Nikon 50mm 1.8. It's tack sharp, fast to focus, and has great low-light ability. I used to shoot a LOT with my Nikon 50mm f1.8 (and my Nikon 50mm f1.4 too), but the 50's have taken a back seat to the 35mm f2.0
There's something I just love about the feel of the 35mm f2 on one of my D300 Nikons. It's light... sure. It's tack sharp... yup. Super resistant to flare... check. Very small and not in your face the way a big f2.8 zoom like the Nikon 28-70mm f2.8 or the newer Nikon 24-70mm f2.8 can be... yeah, it's got that. No intimidation factor from the little 35 when pointed at a subject.
But it's more than all of that combined... more than the sum total of it's characteristics and parts. It has character... not just characteristics. It exudes personality. I may be crazy, but I think my Nikon 35mm f2 has a soul. I can see it when I look at the photos we take together. They say the eyes are the window to the soul, and my 35mm f2 has a beautiful eye.
Beyond the sharpness and clarity that the 35 delivers, beyond the beautiful bokeh and low-light capturing power, the images have soul. They speak to me in a way that is hard to describe, unless of course, you too have this lens and you're sitting there nodding your head as you read this, understanding exactly what I'm saying.
My daughter Lilly is 13 months old. Most of my favourite shots of her are from my Nikon 35mm f2. I know in years to come, when I look back at these precious memories, my appreciation of my little 35 will be even greater.
Even in my wedding work, I find the Nikon 35mm f2.0 to be incredible. It's so light that it doesn't leave me with aching hands and sore arms, even after prolonged use. It's so fast that capturing available light shots at the church is easy. Combined with the lower shutter speed requirements compared to a longer lens (i.e. using the old "one over the focal length" rule... the longer the lens, the higher shutter speed you need... a rule that's even more critical with cropped sensor DSLR's where you should factor in the sensor and allow 1.5X [1.6X if you're a Canon shooter] the lens length as your lowest shutter speed to avoid blurry images), I find the 35mm f2 to be great for natural light during a wedding ceremony.
Portrait work is no different. The Nikon 35mm f2.0 works it's charms. Especially with kids, where they're often moving quickly, the 35's fast 2.0 maximum aperture allows you to stay at a higher shutter speed and still shoot natural light. The focal length is great for getting in close, but not too close. It's size again is a plus, as it's small and not intimidating to small children the way a larger lens can sometimes be.
I really don't have anything negative to say about my Nikon 35mm f2.0. Sure, some will complain that it hasn't be up-dated to AF-S. I say, who cares. It focuses fast and sure. From what I've seen of the newest AF-S primes, they aren't focussing any faster than my 35mm f2. Maybe a little quieter, but really, my 35 is pretty quiet. Quieter is always nice, but the little 35mm f2 is already pretty quiet.
Nikon 35mm f1.8 G AF-S DX
The new Nikon 35mm f1.8 DX looks nice, but you can't use it on a FX body. You CAN use the 35mm f2.0 on an FX DSLR like the D3, D3X, and D700 (and hopefully my soon to be released dream camera... the Nikon D800).
I you haven't tried the Nikon 35mm f2.0, I urge you to treat yourself and try one. Borrow one from a friend, rent one, or just go out and buy one! I recommend getting the 35mm f2.0 over the newer 35mm f1.8, even if you don't currently shoot an FX body. You may be shooting a DX body like the Nikon D300, D90, or D40 now, but down the road we're going to see more of the Nikon line go FX, so you'll be glad you bought the Nikon 35mm AF f2.0 D over the Nikon 35 AF-S f1.8 G DX.
Labels:
favorite lenses,
Nikon 35mm f2.0 AF D
Sunday, May 10, 2009
Nikon 55-200mm VR... a nice little sleeper lens!
AF-S DX VR Zoom-NIKKOR 55-200mm f/4-5.6G ED
I didn't expect to see such great results from this little lens. The Nikon 55-200mm AF-S DX VR is a compact, light little lens, and it's very sharp. I knew this from the published resolution figures before I bought one, but I didn't think it would be this sharp!The Nikkor 55-200mm VR won the American Photo Editor's Choice 2007 Award. I still wasn't expecting to like it this much.
Don't get me wrong, it's no Nikon 70-200mm f2.8 VR. It also doesn't weigh 1470g (3.25 pounds) like the 70-200 does. The Nikon 55-200mm weighs only 335g... less than 1 pound. You can barely feel it on a D300 body.
Sure, it doesn't have the low light capabilities of a f2.8 fast lens, after all, the fastest it gets is f4. Outdoors during the day, you'll most likely not find this much of a limitation. Of course, it's not going to work to well for you in a dark church during a wedding reception, but that's why Nikon makes the 70-200mm f2.8 VR.
The VR on the 55-200mm is good and adds at least a couple stops of usability. I've owned and used both the Nikon 70-200mm f2.8 VR and the 55-200mm VR, and I'd say that the 70-200 has a little better VR system... maybe 4 stops of added usability.
Of course, you didn't expect them to put the same caliber VR system in a $200 lens and a $2000 lens, did you?
(a little hint... if you're shooting in good light and don't need the VR, shut it off. You'll save battery life, and you'll achieve focus faster as you don't have to wait for the Vibration Reduction to finish it's job).
But this little lens is really a gem for the price. It's even got ED glass in it (an ED (Extra-low Dispersion) glass element minimizes chromatic aberration, contributing to superior optical performance), which is likely why it's so sharp!
The front lens element is only 52mm, so it's not going to break your wallet to buy a few filters for it. A 52mm circular polarizer is much cheaper than a 72mm circular polarizer. Trust me, I've bought both.
The Nikon 55-200mm VR is a fantastic little lens. It's light, compact, and super sharp. For the price, you can't beat it. It won't break your back or your wallet!
Here's some photos from our trip to the Brantford Twin Valley Zoo last Sunday, all shot with the Nikon 55-200 VR on one of my D300 bodies. All of these are straigh out of camera jpgs, re-sized to 800 pixels for the web.
Saturday, May 9, 2009
How the Nikon D300 Froze My Bank Account
I was shooting with a pair of 40D Canon DSLR's before the D300 came out. Prior to that, it was a 5D and 30D combo. Prior to that it was a pair of 20D Canons, and before that it was a Nikon D200 and D70 combo.
It was the D300 that brought me back home to Nikon.
The D300 was a revolution in many ways. The D300 offered everything that the previous Nikon flagship (the popular D2Xs) had, and more. Even more amazing, the D300 had Nikon's new industry leading Auto-Focus system, the same one found in the D3! How could this be? No camera maker had ever before put their top of the line AF system into a DSLR at this price point!
The D300 had a rugged, professional build, metal body. The D300 came loaded with a brand new 12 Megapixel sensor that was much cleaner at high ISO than any previous Nikon DSLR (except, obviously, the D3 which was itself a new camera introduced at about the same time as the D300). The D300 offered more features than ever before, and it offered all of this at the un-heard of price of $2,000 Canadian! The camera world was shaken! A camera that did everything better than the D2Xs, at a third of the price!
My D300's have frozen my camera equipment expenditures. Amazingly, I haven't bought a new DSLR in almost 2 years. Even more amazing, I have no plans to purchase one any time soon. The D300 did for me what the F100 did for so many people back when we shot film. It met all my requirements, and then some, leaving me no burning desire to buy any of the latest and greatest that have come since. Granted, the D300 is still fairly new and has most, if not all, of the current Nikon technology, so it's not like I'm missing anything.
What is new for me is the contentment. Previously, I've always been eager to try out the newest DSLR's that are released to see what they can do (and I have). Now, not so much. My D300's perform wonderfully and meet all my photographic needs. The 12 Megapixel sensor inside the D300 is fantastic, and certainly more than enough MP's for all but the most demanding of jobs. Even the incredible D3 and D700 are 12 megapixel, although granted an entirely different 12 megapixels.
The big difference between the Nikon D3 and Nikon D700 sensor versus the D300 sensor is the high ISO performance. The D300 has very good high ISO performance, but the D3 and D700 take high ISO performance to a whole new level. NOTHING can touch them for high ISO performance. Shooting at ISO 6400 is perfectly acceptable with the D3 and D700, whereas, I like to stay at 1600 ISO and below with the D300. Sometimes I'll kick it up to 3200 in a pinch, especially if I know the image is going to be black & white, but basically I stay at 1600 and below when I'm shooting my D300's.
Obviously the other big difference between the D3 / D700 and the D300 is the sensor size. The D3 and D700 are full frame FX chips, while the D300 is a crop sensor DX chip. Full frame isn't such a big deal to me, but for some it is nothing short of the Holy Grail. The big appeal of the D3 and D700 for me is the high ISO performance. They can practically see in the dark. I must admit, I do like the idea of having that SUPER clean high ISO option available... I just don't like the price. :)
While the high ISO performance of the D3 and D700 is appealing, it's not enough for me to justify the added price. The D300 has the same body and auto focus system as the D700, and the same number of Megapixels. The D300 has excellent high ISO performance, just not the Super Human high ISO performance of the D700. As such, for me at this time, there's just not enough there to justify the added expense of the D700 over the D300. The D3 isn't even a consideration for me as I prefer the lighter, smaller D300 / D700 body style to the larger, heavier D3 / D3X body style.
In a nutshell, the only real difference between the D700 and D300 that is a consideration for me is the high ISO performance. The full frame versus cropped sensor isn't really a factor for me as I like both, although I know for many shooters full frame alone is worth the switch to the D700 (or D3 or D3X). I'm used to DX, and I like shooting with DX cameras. That said, I also like FX, and I know I will acclimatize to full frame very quickly when the time comes.
So I'm left in a very comfortable, very foreign position. I'm VERY happy with my D300 Nikon bodies and have no plans to replace them in the near future. I've decided to pass on the D700 for now. In a year or two when the next round of Nikon DSLR's come out, they'll likely offer a whole host of exciting new features, and I'll probably buy one of the new offerings. In all likelihood, the D3X chip will be available in a D700 type body by then (probably a D800, but who knows for sure), and the price will likely be equal to, or lower, than the current D700 pricing. THAT will be a camera I will be SERIOUSLY interested in. Perhaps it will even have the high ISO performance of the D3 and D700, but with the stunning 24 Megapixels of the D3X!
Labels:
Nikon D300,
Nikon D700,
Nikon D800
Wednesday, May 6, 2009
Sault Storm Sky
Sault Storm Sky - a limited edition fine art print by Matt Ballard
On one of our trips to Sault Ste. Marie, Ontario to visit my in-laws, the rain had been off and on. The sky scenery was changing so fast it was hard to keep my eyes on the road. I finally had to pull over at this spot as the view was just incredible.
Print type: archival pigment print
8"x12" - $35 - Limited Edition of 350
12"x18" - $350 - Limited Edition of 35
35% Of All Sales Go To 350.org
Labels:
350.org,
350art.org,
Limited Edition Prints,
Sault Storm Sky
Sunday, May 3, 2009
The Joy of Jpg... Using Images Straight OOC
Let me start by clarifying that I'm a RAW shooter, or as of late, RAW+jpg.
We all know the beauty of RAW, and that no sane person would shoot jpg, but lately I've been finding myself enjoying jpg. Of course, using the RAW+jpg setting on my Nikon D300's, I've still got the RAW files too, so I know they're there if I need 'em. Kinda' like a digital security blanket. :)
But a lot of the time I don't need the RAW files, as the image looks just fine in jpg. In fact, sometimes it's extra work just to get a RAW file developed out of Lightroom to look the way the OOC jpg does (for those of you that don't know, "OOC" means Out of Camera, as in straight out of camera with no modifications or Photoshopping).
Ever look at a RAW image file and find you just can't get it to look quite like it did when you saw it on the camera's LCD? Maybe you've shot RAW+jpg, and the jpg just seems to look better than your jpg you developed from RAW, no matter what adjustments you make?
More and more lately, I'm finding I just go to the OOC jpgs. If you've shot the image well, you likely don't need to adjust it much, if any, and jpgs stand up very well to minor editing like contrast boosts, a color action or two, and a little sharpening. This is especially true of jpgs from the current crop of modern DSLR's.
Jpgs out of DSLR's like the Nikon D300, D90, D700, and D3, contain an incredible amount of data and hold up very well to post-processing. In fact, this is pretty much true of any of the newer DSLR's. The jpg engines in these cameras are doing a fantastic job at processing images.
Granted, there are still a couple of areas where RAW files hold an incredible advantage over jpgs. When it comes to highlight recovery, you just can't beat RAW. Jpg offers little if any highlight recovery room, but RAW offers up to 2 stops of highlight recovery with modern software such as Lightroom 2.3. If you've shot RAW+jpg, you can go to the RAW file for those images where you find you need to pull back the exposure a bit.
The other area where RAW files still have a BIG advantage over jpgs is white balance. If your white balance isn't right OOC, then it's easier and often faster to fix it using the RAW file than it is using a jpg. You may not even be able to fix a jpg file properly, whereas you can almost always fix a RAW file's white balance to your satisfaction.
RAW+jpg offers you the best of both worlds. You've got your jpgs, straight out of camera and ready to go, and you've got your RAW files in case you want to do some serious editing.
Another BIG advantage of RAW+jpg is the speed difference that your computer can view and process the files. This is especially true for those of us that do a lot of work on laptops, which are usually not as powerful as our tricked out desktop machines.
My laptop for example, is a brand new Dell Inspiron 15 with a Core 2 Duo T6400 2.0 Ghz processor and 4 GB of RAM. While still being a very fast machine for a laptop, it is nowhere near as fast as my desktop, an Intel Quad Core with 6GB of RAM. When it comes to working with RAW files, my desktop blows my laptop out of the water. Don't get me wrong, the laptop can handle them... I just have to wait a bit, which I'm not used to doing as I'm spoiled with the speed of my Quad Core desktop.
Here's the thing though... if I just load up the jpgs into my laptop, everything from ingesting to viewing to processing goes much faster, and most of the time, the jpgs are all I need. I can quickly make my selections and any edits without the speed penalty that comes with the RAW files, but I also know I have the RAW files there should I need to go to them.
All the image above are OOC jpgs from my D300, re-sized to 800 pixels using Picasa 3. I specifically used Picasa instead of Lightroom for these, as Picasa is faster and easier to quickly view a folder of jpgs, make a few selections, and re-size for the web (especially on my laptop).
While I might normally tweak a little contrast, fill light, and a few other things in Lightroom, these images are all straight OOC to illustrate the point I've been making. There is a joy in looking through images without having to spend a lot of time working on them. Jpg facilitates this.
Sometimes we get a little too caught up in the craft of making images, and the joy of taking pictures gets lost. Having the jpgs and being able to use them when the RAW isn't needed is liberating.
Next time you pick up your camera, try setting it to RAW+jpg. You might be surprised at how nice it is to re-experience "The Joy of Jpg... Using Images Straight OOC!"
P.S. All of the images above were shot yesterday at the Brantford Twin Valley Zoo, in Brantford, Ontario. It's a fantastic little zoo, and a great place to take the kids. We lucked out on our visit yesterday, as there were newborn goats (in fact, some were being born while we were there) and a newborn Black Bear cub!
Labels:
Brantford Twin Valley Zoo,
joy of jpg,
jpg,
OOC,
RAW
Saturday, May 2, 2009
SB-24 Radar Equipped Snoopers
Check it out... the SB-24 was a radar equipped "Snooper" aircraft long before it was a speedlight!
SB-24 Radar Equipped ‘Snoopers’
Radar equipped Liberator, with an extra crew member to serve as radar operator. In the Pacific, they are used for low-level attacks and shipping strikes at night, and for pathfinder operations. the 13th AF activated the 868th ‘Snooper Squadron’ flying SB-24 on January 1, 1944. The 5th Air Force activated the 43rd BG, 64th BS as a ‘Super Snoopers’.
http://warandgame.wordpress.com/2008/11/12/snooper-aircraft-and-squadrons/
Labels:
SB-24,
SB-24 Radar Equipped Snooper
Friday, May 1, 2009
Nikon SB-24 User Manual Online
If you're like me (and David over at Strobist), you've got a few Nikon SB-24 Speedlights in your arsenal. I love the little beauties, and I'm always on the look-out for more, especially when I can get them for a good deal!
Unfortunately, it hasn't always been easy to track down the Nikon SB-24 User Manual, but today I've got GREAT news. As David was so kind to point out, you can get the SB-24 manual online here!
Enjoy!
P.S. David has a great page on the SB-24 here.
Labels:
Nikon SB-24 Speedlight User Manual,
SB-24
Subscribe to:
Posts (Atom)